Showing posts with label healthy recipes. Show all posts

Wednesday, December 23, 2020

Arbi Kay Pattay or Colocasia Leaves


Arbi kay pattay also known as Colocasia leaves is a traditional Gujarati dish, made with big green leaves. The chickpea flour based batter is applied on the leaves and is tightly rolled up, steamed, cut, sliced into one inch roll than sautéed into a tomato paste.


Arbi kay pattay or taro is a vegetarian dish, served as a side dish or as a light main. This dish can get ready in 45 minutes or less. These are an absolute game-changer. You may be surprised at how great they will taste!


Arbi kay pattay or taro is a vegetarian dish, served as a side dish or as a light main. This dish can get ready in 45 minutes or less. These are an absolute game-changer. You may be surprised at how great these taste!


This recipe can be made as a crispy Indian snack-appetizer or as a perfect side dish with your meal. It is sure to be loved by your friends and family!


This is how my grandmom use to make and now my Mom use to follow the same recipe. I use to observe both of them. My Mom made this recipe just a week back, so I thought about posting this recipe on my blog.


You can use pressure cooker, microwave, instant pot or your regular steamer basket if needed. We are using the regular steamer for steaming taro.


Apply chickpea flour batter on the leaves and tightly roll them up. Now, grease some oil on the steamer and place those leaves on the regular steamer basket, cover it with a lid, steam it for 15-20 minutes or until they are turned golden brown than carefully flip at the other side too. Keep it aside to cool.


You can the slice the colocasia leaves into one inch thick roll than sauté them into the tomato paste, serve it with chapati or enjoy it as a starter.


I make the tomato sauce with no onion and no garlic. Though if you want you can add both onions and garlic.


Arbi kay pattay or taro is a vegetarian dish, served as a side dish or as a light main. This dish can get ready in 45 minutes or less. These are an absolute game-changer. You may be surprised at how great they will taste!


HOW TO MAKE ARBI KAY PATTAY


The process of making Arbi kay pattay is little long as there are various steps involved into it.


1. Preparation - The Colocasia leaves are available in any Asian grocery store or farmer’s market. Just pick the fresh green ones. 

2. Prepare the batter - Wash, dry and trim the stems. Make thick Chickpea flour batter, and apply it on the leaves and tightly roll it up.

3. Steaming - Steam the leaves in a steamer for 15-20 minutes till the colocasia leaves gets nice golden color than carefully flip at the other side too. 

4. Assemble - Keep it aside to cool. When they cool down, slice and cut each taro into 1 inch thick roll.

5. Tempering - Heat a hot pan, stir it by melting a butter into a pan. Add pinch of asafoetida, chopped tomatoes and sauté them for 5 minutes on low flame than add spices like salt, red chilli powder, coriander powder, cumin powder, garam masala and stir-fry them for a minute.

6. Add colocasia leaves - Add arbi kay pattay or taro in the tomato paste and garnish them with cilantro leaves. Mix them to give it a nice flavour and serve it with chapati or enjoy them as a starter!


STEP BY STEP TO MAKE COLOCASIA LEAVES


1. This is how Taro leaves look like. Rinse the leaves first, and pat them dry.


Rinse the leaves first, and pat them dry.


2. In a mixing bowl, add all the ingredients mentioned for the batter - chickpea flour, salt, red chilli powder, coriander powder, carom seeds (ajwain), green chillies, garam masala also squeeze the lemon into it. Add some water slowly to make a thick paste.


This is a chickpea batter which includes chickpea flour, salt, red chilli powder, coriander powder, carom seeds (ajwain), green chillies, garam masala, lime as well . Add some water slowly to make a thick paste.


3. Remove the thick stem of the leaves and gently apply the paste using hands preferably spread it all over the leaf and roll it up. Prepare all the leaves like this.


Spread the chickpea batter than roll the colocasia leaves.


4. Repeat these steps for all the 5 leaves and keep them ready.


Repeat these steps for all the leaves.


5. You can use pressure cooker or an instant pot or your regular steamer basket if needed. We are using the regular steamer so grease some oil and place those leaves in the steamer, cover it with a lid, steam it for 15-20 minutes or until they are turned golden brown than carefully flip at the other side too. Keep it aside to cool.


Steam them in the regular steamer basket.


6. When they cool down, cut each taro leaves into 1 inch thick roll.


When they cool down, cut each taro leaves into 1 inch thick roll.


7. For tempering heat a hot pan, stir it by melting a butter in a pan. Add pinch of asafoetida, stir-fry it for a minute. Add chopped tomatoes, sauté for 5 minutes on low flame than add spices like salt, red chilli powder, coriander powder, cumin powder, garam masala and stir-fry them. Add colocasia leaves or taro and mix them in tomato sauce and serve it with chapati or eat them as a starter and enjoy!!


Step by Step Process of making Colocasia leaves or Arbi kay Pattay


ARBI KAY PATTAY OR COLOCASIA LEAVES

Serves : 3-4 People
Preparation Time : 15 minutes
Cooking Time : 30 minutes
Author : The Food Root


For making 5 Arbi Kay Pattay or Colocasia Leaves Recipe

Ingredients

For the Chickpea Batter


½ cup chickpea flour
¼ tsp coriander powder
¼ tsp carom seeds (ajwain)
¼ tsp red chilli powder 
¼ tsp garam masala powder
2 green chillies
Squeeze ½ tsp lime juice
¾ tsp salt (or to taste)


For Tempering


2 tbsp cooking oil
2 tomatoes, chopped
pinch of asafoetida
½ tsp coriander powder
½ tsp cumin powder
½ tsp red chilli powder
¼ tsp garam masala powder
¾ tsp salt (or to taste)
chopped cilantro leaves for garnishing


Preparation


1. Rinse the colocasia leaves and pat them dry.


2. Place another leaf upside down and trim the stem of the leaves.


3. Meanwhile make the chickpea batter. To make the batter - take a big bowl, add all the ingredients like chickpea flour, salt, red chilli powder, carom powder, green chillies, coriander powder, and squeeze half lime juice. Add some water slowly to make a thick paste.


4. Apply the paste all over the leaf using the hands. Prepare all the leaves like this.


5. We are using the regular steamer basket for steaming the leaves. Grease some oil on the steamer and place the leaves on the steamer, cover it with a lid, steam it for 15-20 minutes or until they are turned golden brown than carefully flip at the same time other side too. Keep it aside to cool.


6. Cut each roll into 1 inch thick slices.


7. For tempering heat a hot pan, stir it by melting a butter in a pan. Add pinch of asafoetida stir-fry it for a minute, than add chopped tomatoes, sauté for 5 minutes on low flame or so than and add spices like salt, red chilli powder, coriander powder, cumin powder and stir-fry it for a minute.


8. Add colocasia leaves or taro, garnish with chopped cilantro leaves, mix them to give it a nice flavour and serve them with chapati or you can also enjoy them as a starter!


Notes


1. You can also fry them in a oil after steaming and eat them as a starter.

2. You can also steam colocasia leaves in your regular steamer, microwave, pressure cooker or an instant pot.

3. You can also use a pinch of turmeric powder while cooking arbi kay pattay.

4. Squeezing lime juice in the chickpea batter is totally optional.

5. I make the tomato sauce with no onion and no garlic. Though if you want you can add both onions and garlic. 

Friday, September 27, 2019

Restaurant Style Malai Kofta Recipe


Malai Kofta is a North Indian dish originated from the Mughlai cuisine. This dish is buttery rich, soft and sweet in taste. It goes well with naan or steamed rice.


Malai Kofta is a North Indian dish originated from the Mughlai cuisine. This dish is buttery rich, soft and sweet in taste. It goes well with naan or steamed rice.


Malai means heavy cream and Kofta refers to the paneer (cottage cheese) khoya balls. It’s a rich dish perfect for parties and special occasions. Malai Kofta is a quick and easy main dish that can be prepared in less than 30 minutes.

This dish is such a hit at all Indian restaurants. There is nothing better than trying out this yummy restaurant style malai kofta recipe. It's one of the best vegetarian punjabi recipes.

My Mother recently surprised us with this dish. It's already been made twice this week at our home. The moment I looked at this dish, I couldn't resist taking the picture for my blog and post it for you guys. I'm super duper excited to share the recipe with you all. I tried this recipe and it came perfect like restaurant style. It is mainly served for lunch and dinner with naan and steamed rice.


Malai means heavy cream and Kofta refers to the paneer (cottage cheese) khoya balls. It’s a rich dish perfect for parties and special occasions.


The stuffing of koftas are made from mashed khoya, grated paneer (cottage cheese), mashed potato and nuts. Then they are deep fried into hot oil. When the koftas are ready they are gently dipped into rich gravy. This gravy is made from onion, tomatoes and indian spices. It's butterly and bright yellow in color. Malai Kofta is mostly sweet in taste but i always try to tame it a bit.

It's one of the easy malai kofta recipe. The recipe is wonderfully rich, hope you guys love it. Please, let me know in the comments below!

Also, follow us on FacebookPinterestTwitter and Instagram and subscribe us by email so you don't miss any of our new recipes.


Malai Kofta Recipe


Serves : 4 People
Preparation time : 15 minutes
Total time : 30 minutes
Author : The Food Root


Ingredients


For gravy

2 tablespoons, butter
1/2 inch long, ginger, grated
4-5 cloves garlic, finely chopped
2 medium onions, chopped
2 medium tomatoes, chopped
1/2 teaspoon, salt or as per taste
3/4 teaspoon, cumin powder
1/4 teaspoon, red chilli powder
1/4 teaspoon, turmeric powder
1/4 teaspoon, garam masala
3/4 teaspoon, coriander powder
1/2 teaspoon, sugar
2 green chillies, chopped
1/2 cup, water
1/2 cup, milk
1/4 cup, fresh cream
1/2 cup, khoya


For kofta

Oil for deep frying
1 cup or 100 gram, grated cottage cheese
1/2 cup or 50 gram, mashed khoya
1 mashed potato
2 tablespoons, corn flour
1/2 teaspoon, salt
1/2 teaspoon, garam masala
1/2 cup, cashews and raisins, chopped


Method


1. Heat butter in a pan, add ginger and garlic and stir-fry until fragrant. Add chopped onion, cook over medium heat, stirring occasionally, for 3 minutes. Next add chopped tomatoes and cook for another 3-4 minutes or so.

2. Then add salt, cumin powder, red chilli powder, turmeric powder, garam masala, coriander powder, sugar and chopped green chilli. Mix everything well. Stir it nicely and cook them on low flame.

3. Add 1/2 cup of water, 1/2 cup of milk, 1/4 cup of fresh cream and 1/2 cup of khoya into the pan and stir occasionally, or for 6-7 minutes.

4. Next, to make kofta, we will take grated cottage cheese, mashed khoya, mashed potato, corn flour, salt, garam masala, chopped cashews, raisins in a bowl. Mix well and knead them into a dough and divide the mixture into the smooth balls.

5. While shaping the balls for koftas, heat the oil in a pan for deep-frying them. Once the oil is hot, dip koftas gently into the hot oil.

6. Once it’s browned from the one side, flip it over and do the same, and place it on the tissue paper.

7. Dip koftas into the gravy just 5-10 minutes before serving and enjoy!


Notes


* You can also stuff kofta with grated paneer, mashed potato and nuts and not add khoya into it but I recommend to add khoya in the koftas as it bring more creaminess and sweet texture in the recipe.


Monday, August 26, 2019

Sautéed Broccoli And Carrots


Heat up your pan and get ready to dig in to the best sautéed broccoli and carrots recipe that goes well with noodles, steamed rice or a vegetable platter.


Sautéed broccoli and carrots is a colourful and delicious side dish. It's super simple and super easy to make. It's one of our family’s favourite meals recipe.


This dish is a crispy and crunchy which will definitely surprise you! It’s a party in your mouth with lot of explosions. A perfect vegan dish for anytime of the day and gets ready in less than 15 minutes.

Sautéed broccoli and carrots is a colourful and delicious side dish. It's super simple and super easy to make. I make these sautéed vegetables recipe so often at our house, as my family love this recipe. I make this dish with carrots, broccoli and bell peppers as these are my favorite vegetables.

Broccoli is the best of all the cruciferous vegetables. It can be eaten raw, but blanching it in boiling water helps it give to a more crisp-tender texture. It protect your body from various diseases. It is rich in dietary fiber, minerals, nutrients and antioxidants. t’s a rich source of Vitamin A, K, C and many other minerals.

Carrots are the versatile vegetable and can be used in various dishes. It has a crunchy texture and a sweet taste. It comes in red, orange and yellow color which is due to pigments. Carotene makes the carrot orange and anthocyanin makes it bit yellow and red. They are rich in Vitamin A, B8, C, L, Folate, Potassium, Iron, Copper and Manganese.

Bell Peppers gives colorful, crispy, crunchy, sweet and salty flavour to the recipe. It comes in three colors - green, red and yellow. You can use pepper of any colour in the dish. They are an excellent source of vitamin A and C and are also a good source of dietary fibre, vitamin E, B6 and folate.

I typically serve this comfort meal as a side dish but you can serve it as an easy appetizer. It is a nutrient dense meal, so tender and tasty which fills you up quickly and tastes best with noodles, steamed rice or a vegetable platter.


Sautéed broccoli and carrots is a beautiful blend of broccoli and carrots. I totally adore the combination of these beautiful veggies, just stir-fry them and enjoy!


How To Make Stir-Fry Vegetables?


It requires basic ingredients you likely have on hand like -  broccoli, carrots, bell peppers, olive oil, a splash of vinegar and flavourful herbs and spices.

1. Add harder veggies first, followed by softer veggies.
2. Only cook the veggies until they’re tender and crisp, but do not overlook them.
3. Feel free to substitute your favourite veggies.
4. Add your choice of flavourful herbs and spices.
5. Add your choice of sauces or condiments, which add flavour boost to your food, and make it savoury, sweet or spicy.
6. Extra virgin olive oil is perfect for sautéing vegetables but in case you don’t have olive oil in hand, you can use butter.

This recipe is a beautiful blend of carrots, broccoli and bell peppers. I totally adore the combination of these beautiful veggies. I'm a great fan of these veggies, but feel free to substitute your favourite veggies. You can control your spice level according to your taste preferences and requirements.

I love making this recipe a lot. It has so much flavours and textures. It tastes best when vinegar and cayenne powder is added, and is served hot.


You can tap a save button and pin this recipe!


Sautéed broccoli and carrots is a perfect vegan dish for anytime of the day and gets ready in less than 15 minutes. It’s a party in your mouth with lot of explosions.


To prepare this yummy dish, first blanch broccoli in hot water then drain them into the bowl of cold water and strain them again and keep it aside for some time. Next, heat olive oil in a pan over medium-high heat, and add carrots and stir-fry them for 3 minutes or until they are tender. Add bell peppers, stir-fry for 2 minutes but do not overcook. Add the broccoli and stir-fry for 2 minutes. Add garlic cloves and sauté for 1 minute. Then add cayenne powder and stir-fry for 1 minute. Season with salt to taste and sauté them for 2 more minutes. Drizzle vinegar and sauté for 1-2 minutes and enjoy.

Make it exciting, but not bland or boring. Add your favourite veggies and condiments and your kids will love it!

Check out my other post on easy and yummy stir-fry recipe - Sautéed Broccoli with Bell Peppers and enjoy!!


Sautéed Broccoli and Carrots


Preparation time: 10 minutes
Cooking time: 15 minutes
Serves: 3 people
Author: The Food Root


Ingredients


1 tbsp extra virgin olive oil or butter
2 large carrots (cut them into thin strips)
1 medium broccoli florets  (300 grams)
1 medium bell pepper (Remove the seeds and cut 1/4 inch slice off)
3 garlic cloves, finely chopped
1/4 tsp salt or as per taste
1/4 tsp cayenne pepper (optional)
1 tsp rice vinegar


Method


1. Bring in a large pot of water to boil. Meanwhile, fill a bowl with a cold water preferably with ice cubes in it. Set it aside. When the water is boiling, add 1/2 tbsp of salt and broccoli florets. After 3 minutes, remove the broccoli with a slotted spoon or drain the florets in a colander. Now plunge them into the bowl of cold water and after 1 minute, strain them again.

2. In a pan, heat 1 tbsp of virgin olive oil or butter. Reduce to low medium heat, when the oil is hot enough, add carrots and sauté approximately for 3 minutes or until they are tender.

3. Then, add bell peppers, and stir well for 2 minutes or until they are tender, but do not overcook.

4. Add the broccoli and toss it for 2 minutes.

5. Next, add garlic cloves and sauté for 1 minute.

6. Season to taste with salt and cayenne powder and stir well for 1 minute.

7. Drizzle vinegar and continue to stir-fry about 2 minutes. Serve Sautéed Broccoli And Carrots and enjoy!


Notes


1. In addition to the florets, the broccoli stems are edible. The stems work well in a stir fry recipes but make sure to peel the skin and cut them into thin circular shape.

2. You can drizzle any sauce you want like - soy sauce, miso sauce or barbecue sauce to enhance the flavour of the meal.

3. You can add lemon and this will enrich your recipe.


* Keep it simple and find vegetables you actually enjoy eating, and try Sautéed Broccoli and Carrots and let me know how you like it!!

Thursday, August 8, 2019

Mango Blueberry Smoothie


Mango Blueberry Smoothie is a simple, healthy rich dessert which will wake up your taste-buds and gives you instant energy. This is my go-to smoothie recipe, and is vegan and gluten free.


Mango Blueberry Smoothie is a simple, healthy rich dessert which will wake up your taste-buds and give you instant energy.


Since summer in India doesn’t seem to end anytime soon, indulge in this delicious mango blueberry smoothie. It’s full of natural fruit flavours and sweetness. It's a delicious and healthy way to start off a day, and the flavours that comes out from the drink is absolutely delightful.

This 7-ingredient recipe is totally refreshing for a hot summer day and is topped with finely chopped nuts. It’s creamy but light, and loaded with rich flavors and fresh fruits.

This blueberry mango smoothie is one of my favorites ever and is perfect for summer. It's a perfect breakfast smoothie for busy mornings and helps in maintaining good health.

This smoothie is high in fibre, potassium and a powerhouse of antioxidants. It’s full of vitamins and minerals, and has a quality source of protein which helps you feel full for hours.


This is a perfect breakfast smoothie for busy mornings and helps in maintaining good health.


Mango season would be totally deprived of it glory if you don't try this delicious mango berry smoothie. It is packed with nutrients and fresh seasonal fruits. You should definitely try this before the mangoes vanish from the market.

Mangoes are a versatile and an interesting fruit. You can add them in slushies, cakes, ice-creams, salads, smoothiesdipspickles, or sweet-dishes. Though, I don't love mango so much but I love adding them in smoothies.

I've also added 1/2 cup of fresh blueberries. They are a popular summer treat which gives a fresh and crisp flavor to the smoothie. Blueberries are packed with various health benefits, and can make the smoothie more wholesome and nutritious, and, it's texture is extremely surprising.

After a bit of trial and error, I used some of the most healthful smoothie ingredients like -

Fruits - Mango, Blueberries
Thickener - Greek yogurt, Ice cubes (optional)
Liquid base - Almond milk, Water (optional)
Flavoring - Vanilla extract, Honey
Protein and Fats - Nuts and seeds for toppings

Toss the ingredients in, blend and you are all set! It’s super easy, super light, super refreshing and a very healthy smoothie recipe.

Hope you love this healthy breakfast smoothie recipe. Let me know in the comment section below!
Much love!
X


IF YOU LOVED THIS RECIPE, YOU'LL DEFINITELY LOVE:


TROPICAL SMOOTHIE


The tropical flavors of this sunshine smoothie is refreshing and loaded with amazing flavors and fresh fruits.. This delicious smoothie can be made in less than 5 minutes.


MANGO BLUEBERRY SMOOTHIE


Serves : 2 People
Preparation time : 5 minutes
Total time : 5 minutes
Author : The Food Root

Ingredients


2 fresh ripe mangoes
1/2 cup fresh blueberries
1/2 cup plain or greek yoghurt
1/2 cup almond milk
1 teaspoon, vanilla extract
2-3 tbsp water (optional)
1 tsp honey or maple syrup
3-4 pieces crushed ice (optional)


Garnish with your choice of fruits, nuts and seeds.

I added -
2 almonds, crushed
2 walnuts, crushed
2 pistachios, crushed
1 tbsp, pomegranate seeds
1 tbsp, cantaloupe seeds

Method


1. Peel the mangoes & cut them into small pieces.

2. In a blender, combine mango chunks, blueberries, greek yogurt, almond milk, vanilla extract and water. Blend for 2-3 minutes, until smooth.

3. Add a little sweetener - honey or maple syrup, if you like.

4. Add crushed ice and blend again for 2-3 minutes.

5. Pour the mango blueberry smoothie in a bowl and garnish with your favourite toppings like fruits, nuts and seeds. Serve fresh and enjoy! 


Notes


1. If you want to keep your smoothie vegan, you can use coconut, hemp, soy or almond milk else you can also use the nonfat milk.

2. If you prefer a thicker consistency, use less liquid. If you prefer a thinner consistency, add a little more liquid.

3. You can also add frozen fruits or add crushed ice to make your smoothie slightly slushy.

Thursday, May 16, 2019

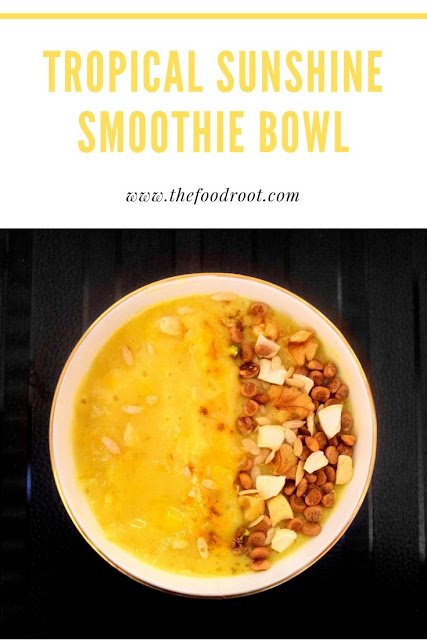
Tropical Sunshine Smoothie


Tropical Smoothie Bowl


It's Mango Season!!! It's that glorious time of the year, where shops and markets are flooded with fresh and juicy mangoes. It's a great time to experiment new recipes with fresh seasonal fruits, so if you get your hands on some, stop yourself from eating them all plain and make a smoothie instead.


Beat the heat on a hot summer day and hydrate yourself with a cool smoothie, filled with frozen mango, banana and orange juice!


Beat the heat on a hot summer day and hydrate yourself with a cool smoothie, filled with frozen mango, banana and orange juice! This fresh fruit smoothie provides you with essential vitamins and minerals. They are a great way to nourish your body with nutrients and are a healthy addition to your daily diet.


Frozen Mango, Banana, Orange juice, Coconut Milk and Honey are few of the ingredients used in this tropical sunshine smoothie. This smoothie can be made in less than 5 minutes. It is one of the reasons, i like it so much. All you need is blender, your favorite fruits and milk.


This smoothie is vegan, gluten free, guilt free and absolutely delicious! A spoonful of this tropical smoothie taste anything like sunshine. This smoothie is my favorite because of its luscious, creamy texture and wonderful flavor.


This smoothie will refresh and rejuvenate your day. It's very simple and a delicious recipe, you can have this smoothie at any time of the day. It's low in sugar and perfect for a morning breakfast.

The tropical flavors of this sunshine smoothie is refreshing. It's very healthy for breakfast and quick enough for a dessert. This delicious smoothie can be made in less than 5 minutes. It is one of the reasons, i like it so much. All you need is blender, your favorite fruits and milk.


This smoothie is vegan, gluten free, guilt free and absolutely delicious! It has a luscious creamy texture and is truly very nutritious.


Start with a base, like a banana, then add frozen mango chunks and orange juice in a blender. Add 1 cup of milk. There are varieties of milk to add like coconut, almond, soy or hemp milk. I added coconut milk. It gives a nice creaminess, nutty flavor and a sweet taste to the smoothie. You can also add greek yogurt, if you want. Add sugar or your favorite sweetener. I added honey. Blend all these ingredients in a blender, until smooth and serve. Decorate with your choice of nuts and seeds, and, enjoy your tropical sunshine smoothie bowl.

Treat yourself with this delicious and easy smoothie and let me know how you like it in the comments below. You can also follow us on Facebook, Pinterest, Twitter and Instagram and subscribe by email so you don't miss any of our new recipes. Enjoy and have a bright sunshine day! ☀️


Sunshine Smoothie Recipe


Serves: 2 people
Preparation time: 2 minutes
Cooking time: 2 minutes
Author: The Food Root


Ingredients


1 cup ripe banana 
1 cup mango chunks, frozen
1/2 cup orange juice
1 cup coconut milk (use more or less depending on how thick or thin you like it)
1 tbsp honey or your favorite sweetener, if needed
A handful of ice cubes

Garnish with your choice of fruits, nuts and seeds

I added -
2 cashews, crushed
2 walnuts, crushed
1 tbsp cantaloupe seeds
1 tbsp buchanania lanzan seeds

Method


1. Place all the ingredients in the blender and blend until smooth.

2. Pour the smoothie in a bowl and garnish it with toppings like nuts and seeds. Serve and enjoy your tropical sunshine smoothie!

Notes


1. If you prefer a thicker consistency, use less liquid. If you prefer a thinner consistency, add a little more liquid.

2. If you want to keep your smoothie vegan and gluten-free, you can add coconut, almond, soy or hemp milk.

3. You can garnish your smoothie bowl with your choice of fruits, nuts and seeds.


Friday, July 6, 2018

Paneer Nugget Casserole


A combination of soya nuggets and paneer (Indian cottage cheese), studded with capsicum, tomatoes and peas, and, flavored with a medley of aromatic herbs and spices.

Paneer Nugget Casserole that we made for lunch today, turned out so yum that i wanted to share the recipe with you all, right away!

This is a healthy, quick and easy side dish that combines the meaty texture of soya nuggets and paneer (Indian cottage cheese), studded with capsicum, tomatoes and peas, and, flavored with a medley of aromatic herbs and spices. You can enhance the flavor of this dish by adding some lime juice and coriander or mint. It tastes phenomenally well with freshly made lacha paratha and fried rice.

Soya are a great source of high quality protein, and are rich in vitamins and minerals. It's a nutrient rich plant protein that has all the essential amino acids, and make an excellent substitute for the meat-based products. You can buy the packet of soya nuggets in an Asian market, and, if you don't have an Asian market near you, you can easily find them online. Soya nuggets can be added in variety of dishes like biryani, pulao, manchurain, soya chunks curry and other stir fry dishes. They are soaked in hot salted water, until, they are soft and fluffy. Once soaked, drain and squeeze out all the excess water from them and they are ready to cook. Soaked soya nuggets should be kept in the refrigerator and used within 3 days.


Paneer Nugget Casserole is an open-end recipe and it's variation are endless. You can always toss in few extra veggies and add brightness to your recipe. I always try to make it differently, depending on what is available at my home.

Paneer, is the star ingredient of this dish. It gives a very mild and a rich creamy texture to this dish. You can either buy paneer from the market or make your own. It should be kept in the refrigerator and used within 2-3 days. I always pan-fry the paneer, so that, it retains it's shape as it cooks, soaks up the flavor, and, doesn't melts.

Paneer Nugget Casserole is an open-end recipe and it's variation are endless. You can always toss in few extra veggies and add brightness to your recipe. I always try to make it differently, depending on what is available at my home. Just keep the texture fairly chunky rather than finely chopping as it contrast well with Paneer and Soya Nuggets. You can control your spice level, mix in your favorite veggies and make it according to your taste preferences and requirements. So just follow your tastebuds and enjoy!


PANEER NUGGET CASSEROLE


Serves: 3 people
Preparation time: 10 minutes
Cooking time: 20 minutes
Author: The Food Root

Ingredients


1 cup soya nutri nuggets
100 gms paneer (Indian cottage cheese), cut them into 1/2 inch cubes
1 large bell pepper, sliced and deseeded, cut them into 1 inch square pieces
1/4 cup peas, fresh or frozen
2 medium-size tomatoes, finely chopped
4 small green tomatoes, should be firm, and feel heavy in your hand, cut them into half (optional)
1/2 inch inch ginger, peeled, grated
4 garlic cloves, finely chopped
2 green chillies, finely chopped
1/4 tsp turmeric powder
1/2 tsp coriander powder
1/2 tsp cumin powder
1/4 tsp chilli powder
1/4 tsp garam masala
1 tsp salt or as per taste
1 tbsp lime juice (optional)
2 tbsp olive oil
chopped coriander leaves, garnishing

Method


1. Soak the soya nuggets in hot salted water for 10 minutes. Once they are soaked, wash few times, drain and squeeze out all the excess water from them and keep aside.

2. Heat oil in a pan, gently add paneer, a pinch of salt and pan-fry them for about 3 minutes. Flip them over and let the other side also fry and keep aside.

3. Next, roast capsicum for 2 minutes. Keep stirring to avoid burning. After 2 minutes of roasting, transfer it to a bowl.

4. Now, heat oil in the same pan, and, add grated ginger, followed by chopped garlic cloves. Give it a stir and cook for 1 minute.

5. Add the chopped tomatoes over medium heat. Cover and simmer over medium-low heat for 3-4 minutes or until the tomatoes are soft and well cooked.

6. Add the green tomatoes, sprinkle the salt, turmeric and coriander powder. Stir and cook for 3 minutes. Then, add peas followed by cumin and chilli powder. Stir and cook for 2 minutes.

7. Add the soya nuggets and the roasted capsicum. Cook for about 2 minutes or until the nuggets and capsicum are softened.

8. Add the roasted paneer cubes into the pan. Mix it together to coat the spice on paneer cubes. Cook for 2 minutes.

9. After 2 minutes, check for salt and add any, if required. Now, add some garam masala at the end and continue to cook for another 2 minutes.

10. Squeeze some lime juice and sprinkle chopped coriander leaves, give it a mix and serve hot.

Notes


1. You can add your favorite veggies or whatever is available at home. The idea is to make the dish more colorful and delicious.

2. Remember to pan-fry the paneer, so that, it retains it shape as it cooks, soaks up the flavor and doesn't melts.

3. Just keep the texture fairly chunky rather than finely chopping as it contrast well with Paneer and Soya Nuggets.

Sunday, April 1, 2018

VIBRANT VEGAN BUDDHA BOWL


This vibrant vegan buddha bowl is filled with veggies like broccoli, peas, corns, tomatoes, served with brown rice and combined with a delicious, simple ginger and lime dressing.


Getting into the groove with this vibrant vegan buddha bowl!! 

This super delicious healthy buddha bowl is packed with grains, nutrients, and tons of veggies to fuel your body and mind.

If you've been following my blog, you would know how obsessed I'm with buddha bowls. I find them so satisfying and nourishing! It's my favorite thing at the moment. You can add whatever veggies, grains, seeds available at home, combined with your favorite dressing, and have these for your breakfast, lunch or dinner!

This fast and easy salad come together in just 10 minutes. It's exciting blend of flavors, textures, and colors will leave you wanting more! This recipe is completely vegan and gluten-free.

This vibrant buddha bowl is filled with veggies like broccoli, peas, corns, tomatoes, served with brown rice and combined with ginger lime dressing.
You can dress this salad bowl with your favorite dressing, or just leave them undressed! I made a delicious, simple ginger and lime dressing, and it's so much cheaper and better than the store-bought stuff.

To make this, you'd have to cook brown rice ahead of time. I like to make big batches of brown rice (or quinoa) and keep them in the fridge so they are ready to make healthy dishes like these.

The broccoli, peas and corn stays vibrant here, because all you're doing is a quick steam then tossing with olive oil, lemon and salt. 
I have used fresh sweet corn. You can also use tinned corn for this salad.

I love using frozen peas in my salad. Well, you don't need to cook them but do remember to wash them with warm water, else you'll end up up with a wet mushy salad. When they are little warm, mix them up with olive oil, vinegar, lemon and salt. 

I always try to make this salad differently, depending on what is available at my home. Just have a look what you have in your kitchen, and play around with vegetables, herbs and spices, and try to make it as per your liking! For the recipe, follow these few simple steps that I have listed below.


VIBRANT VEGAN BUDDHA BOWL


VIBRANT VEGAN BUDDHA BOWL


Serves: 2 People
Preparation time: 20 minutes
Cooking time: 35 minutes 
Author: The Food Root


INGREDIENTS


1 cup brown rice, rinsed
1 cup broccoli, cut into florets 
1 cup frozen peas
1 cup fresh corns (low/ no salt/ tinned or frozen)
1 tomato, cut in circular shapes
2 cups cooked brown rice (or quinoa)
2 tablespoon extra virgin olive oil, divided use
1/2 teaspoon salt or as per taste
1/4 teaspoon ground black pepper
3 tablespoon fresh lemon juice, divided use

Dressing

3 tablespoon fresh lemon juice
1 tablespoon garlic, minced
1 tablespoon ginger, grated
1 tablespoon low sodium soy sauce
2 tablespoon rice wine vinegar
1/2 sugar (optional)
Salt and pepper as per taste

DIRECTION 


1. Boil rice: Bring 2 cups of water to boil into a large saucepan. Once water starts boiling, add 1 cup brown rice, a pinch of salt, cover with a lid and reduce to simmer. After 30-35 minutes, turn off the heat. Remove the lid and let it stand for 10 minutes. 

2. S
team broccoli: To steam, place broccoli florets and a pinch of salt in a steamer basket with 1 inch of water. Meanwhile, fill a bowl with cold water, preferably ice cubes with it. After 2 minutes, remove the florets with a slotted spoon in a colander and immediately, plunge the florets into a bowl of ice cold water. After a minute strain them, and keep it aside. Place the broccoli in a large bowl, toss it with the oil, lemon and salt.

3. F
rozen peas: Next, wash frozen peas with warm water, toss it with the oil, lemon and a pinch of salt and pepper.

4. Steam or boil corns: Steam or boil fresh 2 medium corn cobs till the kernels are tender. You can steam them in an electric cooker, pressure cooker, or steamer. I cooked them in a pressure cooker, add corns along with 2 cups of water, for 4 whistles. Let them cool down and drain the water. Now place it in a bowl and toss it with olive oil, vinegar, lemon and salt.

5. Slice raw veggies: 
Slice any raw veggies of your choice. I added fresh tomatoes in my bowl.

6. Prepare the dressing: To make a dressing, whisk 1 tablespoon minced garlic, 1 tablespoon grated ginger, 3 tablespoon fresh lemon juice, 1 tablespoon soy sauce, 2 tablespoon vinegar in a bowl, add salt and pepper to taste.

7. Assemble your bowl: Assemble your bowl, add brown rice, steamed broccoli, corns, peas, and sliced tomatoes. Season the bowl with salt and pepper. Drizzle the yummy ginger lime dressing and gently toss them to combine.

8. Eat mindfully, enjoying all the flavors and textures!!! 


IF YOU LOVED THIS RECIPE, YOU WILL LOVE:


RAINBOW BUDDHA BOWL : Healthy, filling and a delicious wholesome meal, filled with rice, beans, broccoli, bell peppers, cucumber and combined with almond butter lime dressing to give it a touch of sweetness! 


This satisfying bowl of goodness is filled with rice, red kidney beans, broccoli, bell peppers and cucumber.


Tuesday, July 11, 2017

MEDITERRANEAN CHICKPEA SALAD

In a large bowl, combine chickpeas, tomatoes and cucumber. Pour Cumin-Dijon flavored vinaigrette dressing over the top and toss it well. Season with salt and pepper, and garnish it with grated beets. Serve immediately!

Brighten your day with this fresh and colorful Mediterranean chickpea salad - packed with nutrients and taste! Filled with cooked chickpeas, cherry tomatoes, crisp cucumber, fresh beets and tossed in a vinaigrette flavored dressing with cumin and dijon. This recipe is completely vegan and gluten-free. Lately I've been a bit obsessed with chickpeas salads. This Mediterranean Chickpeas salad was a pure bliss. It has all my favorite Mediterranean flavors. It's super addictive and super satisfying!

Chickpeas are used in varieties of vegetarian recipes and are mostly added in Indian, Mediterranean and South American cuisines. They are very versatile and easy to cook. They can be added in salads, dips, soups, curries, ground into a flour to make variety of snacks like falafel, fritters, sev, boondi, and many more. Chickpeas are one of the best sources of protein, carbohydrates and fiber. 1 cup of cooked beans = 15 grams of protein


To prepare the chickpeas, soak the beans overnight or quick soak for about 4 hours. Add salt, water and pressure cook it for 15 minutes, over medium-high heat. When done, drain the chickpeas in a strainer and let it cool for a while. I usually cook the whole bag of chickpeas (500 grams) at once and use them up within a week. These are much more tastier and healthier than the canned one's.

This salad is particularly delicious if served when chickpeas are slightly warm. If it has been refrigerated, just be sure to allow it to come to room temperature before serving. To make this salad, you can cook chickpeas ahead of time. This salad has an endless combinations. You can pretty much throw in whatever you like. I love beets, cherry tomatoes and cucumber so I added that. Make a simple vinaigrette dressing, drizzle over the top and toss it well. Season with salt and pepper, and serve immediately! 


MEDITERRANEAN CHICKPEA SALAD

Serves: 2-3 people
Soaking time: 4-5 hours
Preparation time: 10 minutes
Cooking time: 15 minutes
Author: The Food Root


INGREDIENTS

1 cup or 200 grams dried white chickpeas (kabuli chana or safed chole)
2 medium size tomato, chopped
1 medium size cucumber, chopped
1 small size beetroot, grated
1/4 teaspoon black pepper
1/4 teaspoon salt or as per taste 

For the Dressing 

3 tablespoons extra virgin olive oil
2 tablespoons white wine vinegar (or apple cider, black wine, balsamic, rice)
1 tablespoon Dijon mustard
1/2 teaspoon cumin, roasted
1 tablespoon lime juice
1 tablespoon minced garlic
1/2 teaspoon dried oregano
1/4 teaspoon salt
1/4 teaspoon black pepper
1/4 teaspoon sugar or honey

DIRECTIONS


1. Cook chickpeas : Wash and soak the chickpeas overnight, or quick soak for about 4 hours in enough water. Drain the water, rinse it again with cold water. Add 1/2 tablespoon of salt and 2 cups of water and pressure cook it for around 15 minutes, over medium-high heat. When done, remove from heat and let it cool for sometime. Drain the chickpeas in a strainer and keep it aside. You can also refrigerate it for a while.

2. Chop raw veggies : Chop your favorite raw veggies and refrigerate until they are ready to use. You can pretty much throw in whatever you like. I added cherry tomatoes, cucumber and garnished it with fresh beetroots.

3. Prepare the dressing : Whisk all the ingredients - (olive oil, white wine vinegar, Dijon mustard, cumin, lime juice, minced garlic, dried oregano, salt, black pepper, sugar or honey) in a bowl until well blended. Refrigerate until ready to serve. The dressing keeps well for 3-4 days.

4. Assemble : In a large bowl, combine chickpeas, tomatoes and cucumber. Pour Cumin-Dijon flavored vinaigrette dressing over the top and toss it well. Season with salt and pepper, and garnish it with grated beets. Serve immediately! Enjoy!

NOTES

1. Wash and soak the chickpeas overnight, or quick soak for about 4 hours in enough water.
2. Chop your favorite raw veggies and refrigerate until they are ready to use.
3. You can make generous amount of dressing and keep it in the fridge for 3-4 days.
4. Whisk the vinaigrette 2-3 times, before serving.
5. This salad is particularly delicious if served when chickpeas are slightly warm.
6. If the chickpeas has been refrigerated, just be sure to allow it to come to room temperature before serving.