Monday, February 20, 2017

CREAM OF MUSHROOM SOUP

how to make cream of mushroom soup

There is nothing more comforting than digging into a bowl of cream of mushroom soup.


This warming, cream of mushroom soup is a pure comfort in a bowl. This is a simple, healthy soup to keep you and your family warm. It's a rich, flavorful soup, filled with cream, mushrooms, milk and organic seasonings. It's good as a side dish or as a meal on its own. I'm sure you'll never go back to canned soup once you've made this recipe. It's super simple and super delicious. You can make this at any time of the day.

I'm a big fan of soups. Whenever I dine out, I always order soup but I rarely make them at home. Yesterday, I got a packet of fresh button mushrooms from the market and thought of making it. I was skeptical at first but this soup turned out wonderfully!! It's a great appetizer and it'll surely win your heart. This silky, creamy mushroom soup is perfect for a lunch or a dinner party starter. It can help by filling you up without too many calories.

This soup is creamy and full of rich flavors and textures. I love the combination of mushrooms and cream here. It took me less than 30 minutes to make this recipe. You can grind the mushrooms in any type of blender. Frankly, I don't use my blender often but it's a very convenient way to make rich, creamy and velvety soups. You can substitute cream by adding more milk in the soup. It depends on your taste. Treat yourself to this hearty and warming cream of mushroom soup.

You can go through these step by step methods!

slicing button mushrooms

1. Clean 200 grams of button mushrooms with the damp paper towel and finely slice them. Keep them aside.

heat butter in a large saucepan, add ginger and garlic cloves, saute until they turn golden brown.

2. Heat 3 tablespoons of butter in a large saucepan, add 1/2 inch of grated ginger, 4 cloves of chopped garlic and sauté it for 40-50 seconds until they turn golden brown.

add chopped onions and stir it for 3-4 minutes.

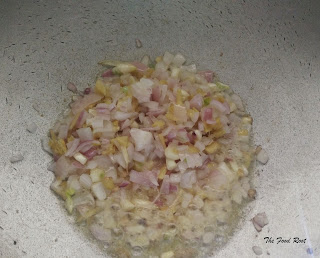
3. Next, add a chopped onion in the pan and saute it for 3-4 minutes.

add sliced mushrooms and saute it for 2 minutes.

4. Add sliced mushrooms in the pan. Sauté it for 2-3 minutes. Loosely cover the pan for 4-5 minutes. Stir occasionally. Turn off the flame.

leave 4 tablespoon of mushrooms in the pan and grind the remaining cooked mushroom by adding 1.5 cups of milk in a blender. Whizz everything until smooth.

5. Leave 4 tablespoon of mushrooms in the pan and grind the remaining cooked mushroom by adding 1.5 cups of milk in a blender. Whizz everything until smooth. Once you have grind the mushrooms, transfer it to the pan and reheat it.

Add 2 cups of water and 1/2 cup of cream and bring it to boil. season it with salt, black pepper and oregano and stir it well.

6. Next, add 2 cups of water and 1/2 cup of cream, and bring it to boil. Season it with 1 tsp of salt, 1/2 tsp of black pepper and/or 1/2 tsp of oregano. Stir it well. SERVE PIPING HOT!!


CREAM OF MUSHROOM SOUP


Preparation time : 10 minutes
Cooking time : 20 minutes
Serves : 4-5 people
Author : The Food Root

INGREDIENTS
1 packet or 200 grams - Button mushroom, sliced
1/2 cup - Cream
3 tablespoon - Butter
1/2 inch - Ginger, peeled, grated
4 cloves - Garlic, finely chopped
1 medium chopped onion
2 cups of water
1.5 cup - Milk
1 teaspoon - Salt
1/2 teaspoon - Black Pepper
1/2 teaspoon - Oregano

METHOD
1. Clean 200 grams of button mushrooms with the damp paper towel and finely slice them. Keep them aside.

2. Heat 3 tablespoons of butter in a large saucepan, add 1/2 inch of grated ginger, 4 cloves  of chopped garlic, and cook it for 40-50 seconds until they turn golden brown.

3. Next, add the chopped onion in the pan and sauté it for 3-4 minutes.

4. Add sliced mushrooms in the pan. Sauté it for 2-3 minutes. Loosely cover the pan for 4-5 minutes. Stir occasionally. Turn off the flame.

5. Leave 4 tablespoon of mushrooms in the pan and grind the remaining cooked mushroom by adding 1.5 cups of milk in a blender. Whizz everything until smooth.

6. Once you have grind the mushrooms, transfer it to the pan and reheat it.

7. Next, add 2 cups of water and 1/2 cup of cream, and bring it to boil.

8. Season it with 1 tablespoon of salt, 1/2 teaspoon of black pepper and/or 1/2 teaspoon of oregano. Stir it well. SERVE PIPING HOT!!

NOTES
1. I used button Mushrooms, you can use any other variety of mushrooms

2. Use milk and cream at the room temperature.

3. You can grind your mushrooms with any type of blender you have.

4. You can also add vegetable stock in the soup instead of water and/or milk.

5. You can substitute cream by adding more milk in the soup.

6. You can also add 2 tablespoon of flour in the soup.


Wednesday, February 15, 2017

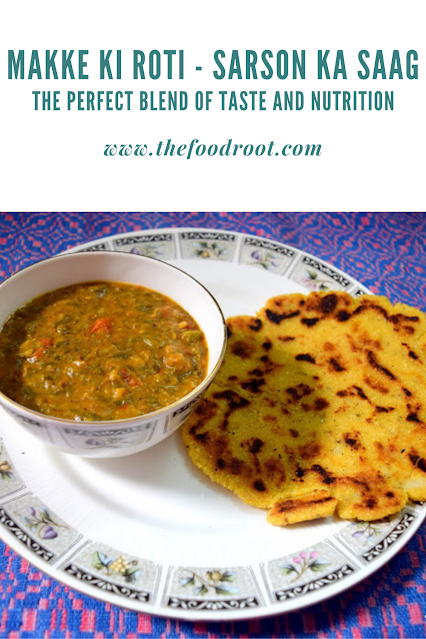
MAKKE KI ROTI - SARSON KA SAAG


how to make makke ki roti and sarson ka saag
 
Tantalize your taste buds with the perfectly homemade filling meal of Makke ki Roti and Sarso ka Saag!!

Winter is the best season to indulge in seasonal delicacies that are not only delicious but are also healthy. For a brilliant winter rendition, indulge in Makke ki Roti and Sarso ka Saag, a healthy, wholesome and power-packed meal. This authentic meal is much loved in the Punjab regions of India and Pakistan.

It is consumed throughout the year but mostly eaten during the winters. Since mustards are grown abundantly in Punjab and other parts of the country. It is extremely flavorful dish and served in almost all the restaurants and food joints across the country. It is highly nutritious because mustard leaves contain a lot of iron and protein.

Makke ki roti is a flat, unleavened Punjabi bread made from corn flour and Sarson ka Saag is a traditional Punjabi dish made from mustard leaves and spinach. The combination of Makke ki Roti and Sarso ka Saag is surely irrefutable, but when topped with homemade white butter it's totally unbeatable. 

Sarson ka Saag is cooked on slow fire for hours. The Saag is generally is served with generous topping of homemade fresh white butter or clarified butter which enhances it's flavor. It's one of my all-time favorite winter dishes. It's a wonderfully delicious and nutritious dish. It's rich in vitamins and minerals.

Always remember to add 2 boiled (mashed) potatoes and a tbsp of clarified butter to soften the dough. You can make makke ki roti with the help of rolling pin or feel free to use something like a wine bottle but it will be good if can try patting them between your palms as the dough is very soft.

This slow cooking saag recipe takes a little time to make but it is well worth the wait. To save the time, you can clean the greens a day before, put them in a plastic bag and keep them in the refrigerator. The mustard greens has a bitter and a pungent smell but can be subdued it by adding spinach and bathua.

I have added 2 bunches of mustard greens and a bunch of spinach and bathua (chenopodium) each in my recipe. Clean the greens, wash and chop them. Add all the greens followed by water, salt and ginger in a pressure cooker. You can pressure cook them for 4 whistles and mash the saag with a wooden masher. Do not make a smooth paste, just coarsely mash it. After preparing the tomato tempering and add the cooked saag in the pan. Stir and simmer for couple of minutes and it's ready. Add lot's of white butter or ghee (clarified butter) while serving the saag with makke ki roti.


makke ki roti - sarson ka saag


MAKKE KI ROTI - SARSON KA SAAG


Preparation time : 1 hour
Cooking time : 1 hour
Serves : 6-8 people
Author : The Food Root


INGREDIENTS
For Makke ki Roti

2 cup Maize flour
2 potatoes boiled (peeled and mashed)
Water for kneading
1 teaspoon - Clarified butter
1 teaspoon - Carom seeds (ajwain)
Salt to taste

METHOD
1. Mix all the ingredients and make a soft dough : In a bowl add 2 cups of Maize flour, 2 boiled (mashed) potatoes, 1 tsp of carom seeds, 1 tsp of clarified butter, salt (1 tsp) and mix it well. Add sufficient water and knead into a soft dough.

2. Pat the dough with your hands : Divide the dough into equal sizes and try patting them between your palms as the dough is very soft. You can also make makke ki roti with the rolling pin or feel free to use something like a wine bottle. If the dough is sticking to the surface put couple of oil drops or use dry flour accordingly.

3. Heat griddle and place the roti : Now, heat griddle or tava (flat shaped, frying pan) and add little ghee so that it does not stick. Now place the roti very carefully on it. Flip and cook on the other side. Cook the roti with ghee till golden brown. Enjoy it with the delicious Saag!!

INGREDIENTS
For cooking Saag

2 bunches of Mustard Greens (sarson ka saag)
1 bunch of Spinach (palak)
1 bunch of Bathua (chenopodium)
2 cups of water
2-3 green chillis - chopped
1 inch ginger - peeled, grated
Salt to taste

For Tempering
4 tablespoon clarified butter
pinch of asafoetida
5-6 garlic cloves - finely chopped
2 medium size onions - chopped
4 medium size tomatoes - chopped
1/2 teaspoon - Red chili powder (lal mirch)
1/4 teaspoon - Turmeric powder (haldi)
1 teaspoon - Coriander powder (sukha dhania)
1/4 teaspoon Garam masala
Sat to taste

METHOD
1. Clean, wash and chop the greens and add them in the pressure cooker : Remove all the hard stems of the greens. Wash all the greens for 4-5 times properly and chop them. Next, add all the chopped greens in the pressure cooker followed by 2 cups of water, 3 chopped green chillis, 1 inch of grated ginger and salt to taste (1 tsp). Pressure cook it for 3-4 whistles. The best way to cook is to wait for the first whistle on high flame then turn the heat down for 12-15 minutes. Increase the heat again and you'll need to pressure cook it for another 3 more whistles.

2. Mash the Saag : Switch off the flame and remove it. Wait for the pressure to release completely before opening the cooker. Next, open the lid and mash the saag with wooden masher. Do not make a smooth paste, coarsely mash it.

3. Sauté onions and garlic in a pan : Heat 4 big tablespoon of clarified butter (ghee) or oil, add a pinch of asafoetida powder followed by 6-7 finely chopped garlic cloves and fry them for 40-50 seconds. Next, add 2 chopped onions and stir it. Keep stirring and adjusting the flame so that onions cook slightly golden brown.

4. Prepare the tomato puree tempering : Add 4 chopped tomatoes and sauté it for around on 7-8 minutes on low-medium flame. Next, add the spices - 1/2 tsp Red chili powder, 1/4 tsp Turmeric powder 1 tsp of Coriander powder and salt to taste (1 tsp). Stir it well. Let the mixture cook, till the oil separates.

5. Add the cooked saag in the pan : Now add the cooked Saag in the pan. Stir it for another 8-10 minutes on low/ medium flame. Add 1/4 tsp of garam masala and mix it well. Turn off the heat and remove it

6. Serve and Garnish : Now, transfer the saag to a serving bowl and add loads of white homemade butter or clarified butter. Serve the Saag with a bite of soft Makke ki Roti and enjoy it with onions, pickle and jaggery.

NOTES
1. Add boiled (mashed) potato and a tbsp of clarified butter to soften the dough.

2. You can also make makke ki roti with the rolling pin or feel free to use something like a wine bottle. If the dough is sticking to the surface put couple of oil drops or use dry flour accordingly.

3. This slow cooking saag recipe takes a little time to make but it is well worth the wait. To save the time, you can clean the greens a day before, put them in a plastic bag and keep them in the refrigerator.

4. The mustard greens has a bitter and a pungent smell but can be subdued it by adding spinach and bathua. If you don't want to add spinach or bathua you can go ahead and make it by just adding the mustard greens.

5. Pressure cook the saag for 3-4 whistles. The best way to cook is to wait for the first whistle on high flame then turn the heat down for 12-15 minutes. Increase the heat again and you'll need to pressure cook it for another 3 more whistles.

6. Mash the cooked saag with wooden masher. Do not make a smooth paste, coarsely mash it.

7. Add loads of white homemade butter or clarified butter. Serve the Saag with a bite of soft Makke ki Roti and enjoy it with onions, pickle and jaggery.


Thursday, February 9, 2017

NEW POTATOES AND SPRING PEAS IN A TANGY TOMATO GRAVY

get ready to tingle your tastebuds with these new potatoes and spring peas in a tangy tomato gravy.

Get ready to tingle your tastebuds with these new potatoes and spring peas in a tangy tomato gravy

This winter, let's make these beautiful New Potatoes with Spring Peas in a tangy tomato gravy. This is a fantastically easy dish to make and it's pretty tasty too!! It's a classic Punjabi dish which is very popular in the northern part of India and goes well with Indian breads or rice. It is popularly known as Aloo-Matar in India.

It was a huge hit with everyone in my house. I love the combination of new potatoes and spring peas. It's different and very delicious. You can make this flavorful dish by combining these two veggies in a tangy tomato sauce.

You can add any type of potato in this dish and cut them in small or large chunks. Since, I'm adding the new potatoes in my dish. I don't feel the need to cut them as they are already very small in sizes.

Let's talk about these two veggies. Peas is considered as a 'starchy vegetables'. They are widely grown as a cool season vegetable. I like all kinds of peas, spring peas is one of them. Spring peas are very sweet and tender. They are a seasonal vegetable. They are grown and harvested in Spring when the weather is cool.

Potatoes are the most humble and versatile ingredient which is widely used in all types of cuisines. It is the fondest root vegetable which is loved by everyone. There are various types of potatoes but new potatoes are my favorites. New potatoes are the first potatoes that are dug in spring or early in summer. Since, new potatoes are harvested before reaching maturity, their skin is very thin and tender. They have a delicate sweet flavor and creamy texture. They can be stored in a paper bag but should be eaten within a week.

I usually don't boil new potatoes. I prefer to cook it with the traditional low and slow cooking method which gives it an intense flavor. I lower down the heat, loosely cover the pan and simmer the flame for about 18-20 minutes. Simmering cooks the food gently and slowly. It allows various tastes to mingle and layer one over the other. It helps to keep the flavor of ingredients separates and also helps to keep the crunchy texture.

This dish is cooked without onion and garlic. There are many people who think, if they don't use onions and garlic in their curry, the end result will be bland but let me tell you, it is just a myth. It is very much possible to make the gravy flavorful and richer without using onion and garlic. It's purely a tomato based curry. It's very easy to make and it's delicious too!! I do hope you try this recipe out. Serve this dish with Indian breads or rice and you'll love it.

NEW POTATOES AND SPRING PEAS IN A TANGY TOMATO GRAVY


Preparation time: 7-8 minutes
Cooking time: 30-35 minutes
Serves: 4 people
Author: The Food Root

INGREDIENTS
4 medium size tomatoes - puree
4-5 new potatoes
1 cup peas (fresh or frozen)
2 cups of water
1/2 inch ginger - peeled, grated
2 tablespoon - ghee/clarified butter or oil
1 or 2 green chilli, chopped
pinch of asafoetida
1/4 teaspoon - red chili powder
1/2 teaspoon - coriander powder (sukha dhania)
1/4 teaspoon - turmeric powder
1/4 - garam masala
Salt to taste
coriander leaves (chopped)

METHOD
1. Prepare the tomato puree tempering: Heat 2 tablespoon of oil in a pan, add a pinch of asafoetida powder followed by ginger. Fry them until they are golden brown. Now, add 1 cup of tomato puree and 2 chopped green chilli and sauté it for about 5-6 minutes on low flame. Next, add in the spices - 1/4 teaspoon of red chili powder, 1/2 tea teaspoon of coriander powder, 1/4 teaspoon of turmeric powder and stir it well. Let the mixture cook until the oil separates.

2. Add the raw new potatoes: Now add 4-5 raw new potatoes and cover the pan. Let them cook for around 6-7 minutes on low medium flame. When the potatoes are cooked, add salt and mix it well.

3. Add the peas: Next, add 1 cup of peas and cover the pan for next 4-5 minutes on a low flame.

4. Prepare the gravy: Add 2 cups of boiling water and cook it for about 7-8 minutes. Once boiling point is achieved boil it gentle over a low heat of 2 minutes.

5. Garnish and serve: Next, add 1/4 teaspoon of garam masala and chopped coriander leaves and stir it for 2-3 minutes. Turn off the heat and remove it. Serve it with roti, naan or rice.

NOTES
1. You can save your time and add the cooked (boiled) potatoes in the dish if you wish. I like the crisp flavor of the new potatoes so I didn't boiled them.
2. You can add any type of potatoes in this dish and cut them in small or large chunks. Since, I'm adding the new potatoes in my dish. I don't feel the need to cut them as they are already very small in sizes.
3. You can also add the frozen peas, just allow it to warm for 5-7 minutes before adding them in the pan.
4. The peas will always remain bright green if the salt is added while preparing the tomato puree tempering. In this case, add salt, after cooking the potatoes.


Saturday, February 4, 2017

DRY FRUIT CUSTARD

Dry fruit custard is a simple recipe and made up with few ingredients: milk, sugar, dry fruits and custard powder.


Dry Fruit Custard - Dry fruit custard is a simple recipe and made up with few ingredients: milk, sugar, dry fruits and custard powder.


Dry Fruit Custard is my new favorite dessert. I can have this all day and night. It's a sweet treat at the end of your dinners or even when you're planning to make a dessert for big dinner party or for your family and friends. I've been making this so much lately, had to share the recipe with you. This frozen custard exactly taste like an ice cream. It's so good and so easy that if you eat and try this delightful dessert once, you'll make it all the time.

There are quite a few methods of making custard but I usually make it with the custard powder. I'm using vanilla flavored custard powder. I like this dessert from my childhood days. This is my go-to custard recipe, and yes - it's eggless!!

Dry fruit custard is a simple recipe and made up with few ingredients: milk, sugar, dry fruits and custard powder. Every spoonful of this dessert delivers a creamy, smooth texture with a rich taste of vanilla flavor. The best thing about this is, it doesn't requires baking. It's a very soft and creamy dessert.

You can eat a warm freshly made custard or you can refrigerate it for later. You can even play with the flavors of custard by using fruits, dry-fruits, chocolate, paan or anything you like.

Treat your guests or make for your family. This mouthwatering dessert is one of the best treats for your friends and family!! It's the most easiest dessert to make and it's healthy too!!

I have followed a very simple custard making recipe that only uses milk, sugar, dry fruits and custard powder (vanilla flavor). Do try it, it's very delicious!


Dry Fruit Custard - first chop all the dry fruits like cashew, raisins, pistachios and almonds and keep it aside.

First chop all the dry fruits - cashew, raisins, pistachios and almonds and keep it aside.

Dry Fruit Custard - Now, heat 4 cups of milk in a saucepan and let it boil. After 4-5 minutes, add 1 cup of sugar and stir it for 2 minutes.


Now, heat 4 cups of milk in a saucepan and let it boil. After 4-5 minutes, add 1 cup of sugar and stir it for 2 minutes.

Dry Fruit Custard - Meanwhile, take a bowl and add 4 tablespoon of custard powder, 3 tablespoon of warm milk or water and mix it together. Make sure the custard paste is smooth.


Meanwhile, take a bowl and add 4 tablespoon of custard powder, 3 tablespoon of warm milk or water and mix it together. Make sure the custard paste is smooth.


Dry Fruit Custard - Next, add the custard paste in the hot boiling milk. Keep stirring until there are no lumps.


Next, add the custard paste in the hot boiling milk. Keep stirring until there are no lumps.

Dry Fruit Custard - Add in the dry fruits. Mixture will start to thicken slowly. Continue stirring and bring it to boil and switch off the flame.


Add in the dry fruits, followed by crushed cardamom pods (seeds removed) and stir it for 2-3 minutes. Mixture will start to thicken slowly. Continue stirring and bring it to boil and switch off the flame.


Dry Fruit Custard - Now transfer the custard into the bowls. garnish them with the remaining chopped dry fruits. Let it cool. Refrigerate it and serve chilled.


Now transfer the custard into the 6-7 medium size bowls and garnish them with the remaining chopped dry fruits. Let it cool and then refrigerate it for 3-4 hours. Serve chilled.


Dry Fruit Custard - Dry fruit custard is a simple recipe and made up with few ingredients: milk, sugar, dry fruits and custard powder.


DRY FRUIT CUSTARD


Preparation time: 2 minutes
Cooking time: 15 minutes
Serves: 6-7 people
Author: The Food Root

Ingredients
4 cups : Milk
1 cup : Sugar
3-4 tablespoon : Custard Powder
8-10 pieces : Cashews
8-10 pieces : Raisins
8-10 pieces : Pistachio
10-12 pieces : Almonds
3-4 pieces : Cardamom

Method
1. First chop all the dry fruits - cashew, raisins, pistachio and almonds and keep it aside.
2. Now, heat 4 cups of milk in a saucepan and let it boil.
3. After 4-5 minutes, add 1 cup of sugar and stir it for 2 minutes.
4. Meanwhile, take a bowl and add 4 tablespoon of custard powder, 3 tablespoon of warm milk or water and mix it together. Make sure the custard paste is smooth.
5. Next, add the custard paste in the hot boiling milk. Keep stirring until there are no lumps.
6. Add in the dry fruits, followed by crushed cardamom pods (seeds removed) and stir it for 2-3 minutes. Mixture will start to thicken slowly. Continue stirring and bring it to boil. Switch off the flame.
7. Now, transfer the dry fruit custard into the 6-7 medium size bowls and garnish them with the remaining chopped dry fruits.
8. Let it cool and then refrigerate it for 3-4 hours. Serve chilled.

Notes
1. Adjust the quantity of custard powder as per the thickness you need.
2. Add sugar as per your taste.
3. You can play with with flavors of custard by using fruits, dry fruits, chocolate, paan or anything you like.
4. You can eat a warm freshly made custard or you can refrigerate it for later.
5. Adding Cardamom pods in custard is optional. You can leave it if you don't like the flavor of cardamoms.

Wednesday, February 1, 2017

DAL PAKWAAN

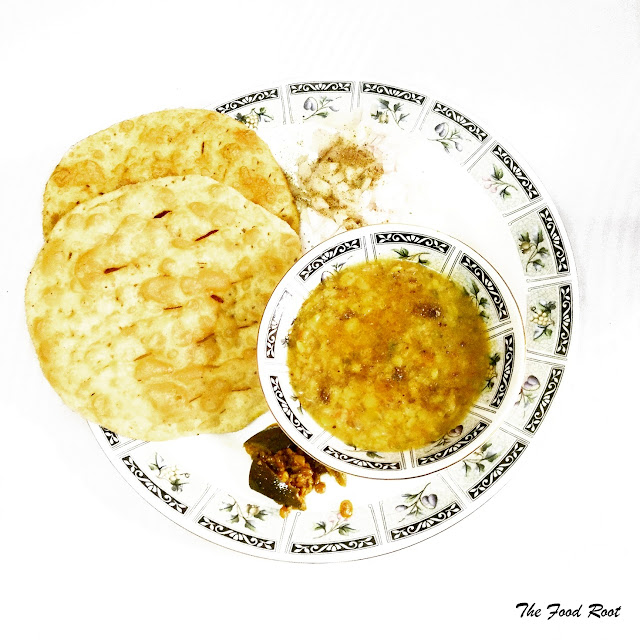
Dal Pakwaan is an authentic delicacy among Sindhis. It is mostly served as breakfast or brunch and loved by everyone.
Scoop the dal with a bite of crispy pakwaan!

Dal Pakwaan an authentic delicacy among Sindhis, mostly served as breakfast or brunch. It's a combination of Dal (lentils) and Pakwaan (crunchy snack). It's one of the easiest, and yet lip smacking dish. It's my favorite among the few Sindhi dishes that I have relished so far and is something that is often prepared in our kitchen. It's an ideal dish for brunch which you would love to serve to your family.

Pakwaan is deep fried crisp flat bread prepared with all-purpose flour (maida), carrom seeds (ajwain) and crushed black pepper which is served alongside with Dal.

I added both bengal gram (chana dal) and black gram split (urad dhuli) in this. Though, urad dhuli is not the part of original recipe but I added both the lentils in equal quantity. This dal will give you a perfect nutty sweet texture of bengal gram and a creamy texture of black gram. In punjabi we call it as 'maah choleyan di dal'. I don't like chana dal so I always add urad dhuli to get the right flavors. If you don't like urad dhuli you can make it with chana dal. The method is same.

I haven't soaked the lentils here, I directly pressure cooked it. This process will take 15-20 more minutes. I find it better because you can control how far you can take it and this method will give you perfect flavors and creamy texture.

To get the authentic taste of Dal Pakwaan, add some dry mango powder (amchur) in the dal. Sprinkle some chaat masala, squeeze in the lemon juice and it will taste delicious. Scoop the dal with a bite of crispy pakwaan and enjoy it with onions, pickle or your favorite chutney. Yummmm!!!

DAL PAKWAAN


Preparation time: 30 minutes
Cooking time: 40 minutes
Serves: 4 people
Author: The Food Root

FOR DAL
Ingredients
For Cooking Lentils
1/2 cup or 100 grams - bengal gram (chana dal)
1/2 cup or 100 grams - black gram split (urad dal dhuli)
2.5 to 3 cups - water
1 teaspoon - salt
1/2 teaspoon - turmeric powder
1 - 2 chopped green chilli
2 cloves (lavang)
1/2 inch cinnamon (dalchini)

For Tempering
2 tablespoon - clarified butter or oil
1/2 inch ginger - peeled, grated
5-6 cloves - garlic, finely minced
2 medium size onions - chopped
2 medium size tomatoes - chopped
1/4 teaspoon - red chili powder (lal mirch)
1/2 teaspoon - coriander powder (sukha dhania)
1/2 teaspoon - garam masala
1 teaspoon - dry mango powder (amchur)
coriander leaves (chopped)

For Garnishing
1 teaspoon - chaat masala
1 teaspoon - lemon juice

Method
1. Wash 1/2 cup of chana dal, under the running water. Drain it completely and add into the pressure cooker. Next, add 3 cups of water and pressure cook it for 1 whistle on high flame. After 1 whistle, turn off the heat and wait for the pressure to release completely before opening it.

2. Open the lid and add washed 1/2 cup of urad dal dhuli and the spices - 1 teaspoon of salt, 1/2 teaspoon of turmeric powder, 2 cloves, 1/2 inch of cinnamon and 2 chopped green chillis. Add water if required and pressure cook it again for 1 whistle. After 1 whistle, switch off the flame and remove it.

3. Heat about 2 tablespoon of clarified butter or oil in a pan and add ginger and garlic paste and sauté it for 40 to 50 seconds on low to medium flame. Next, add 2 chopped onions and stir it. Keep stirring and adjusting the flame so that the onions cook slightly golden brown.

4. Add 2 chopped tomatoes and sauté it for around 5 minutes on low to medium flame. Next, add 1/4 teaspoon of red chilli powder and 1/2 teaspoon of coriander powder and stir it well.
Let the mixture cook till the oil separates.

5. Now, add the cooked dal in the pan. Stir it for next 10-15 minutes till it's nicely cooked. Add 1/2 teaspoon of garam masala, 1 teaspoon of dry mango powder, chopped coriander leaves and mix it well. Stir it again for 2-3 minutes. Turn off the heat and remove it.

6. Transfer the dal to a serving bowl. Sprinkle some chaat masala, squeeze in the lemon juice and it will taste delicious. Scoop the dal with a bite of crispy pakwaan and enjoy with onions, pickle or your favorite chutney!!


FOR PAKWAAN
Ingredients
1 cup or 200 grams - all-purpose flour (maida)
1 cup - lukewarm water
1 teaspoon - salt
1 teaspoon - carrom seeds (ajwain)
1/2 teaspoon - crushed black pepper
1 tablespoon - oil

Method
1. In a bowl, add the all-purpose flour, 1 teaspoon of salt, 1 teaspoon of carrom seeds, 1/2 teaspoon of crushed black pepper, 1 tablespoon of oil and mix it well.

2. Add sufficient water and knead into a semi-soft dough.

3. If the dough feels sticky, brush it with 1 tablespoon of extra dough and make it smooth. Set the dough aside and let it sit for atleast 15 minutes or longer.

4. Divide the dough into 7-8 balls and roll it into 4 inch diameter. Use your hand or a rolling pin to lightly flatten each ball. If the dough is sticking to the surface put couple of oil on the surface.

5. Prick the rolled dough with a fork all over, so that they don't puff up while frying.

6. Now, heat oil in a deep frying pan till the smoking point. Fry the each pakwaan on low heat till it turn golden and crisp. Fry one pakwaan at a time, make sure you press down the pakwaan when it's fluff up.

7. Remove the pakwaan on tissue paper to absorb the extra oil.

Notes
1. I added both bengal gram (chana dal) and black gram split (urad dhuli) in my dish. Though, urad dhuli is not the part of original recipe but I added both the lentils in equal quantity. If you don't like urad dhuli you can make it with chana dal. The method is same.

2. I haven't soaked the lentils here, I directly pressure cooked it. This process will take 15-20 more minutes. I find it better because you can control how far you can take it and this method will give you perfect flavors and creamy texture.

3. In order to obtain crisp, crunchy pakwaan prick the rolled dough with a fork so that they don't puff up while frying.