Wednesday, December 23, 2020

Arbi Kay Pattay or Colocasia Leaves


Arbi kay pattay also known as Colocasia leaves is a traditional Gujarati dish, made with big green leaves. The chickpea flour based batter is applied on the leaves and is tightly rolled up, steamed, cut, sliced into one inch roll than sautéed into a tomato paste.


Arbi kay pattay or taro is a vegetarian dish, served as a side dish or as a light main. This dish can get ready in 45 minutes or less. These are an absolute game-changer. You may be surprised at how great they will taste!


Arbi kay pattay or taro is a vegetarian dish, served as a side dish or as a light main. This dish can get ready in 45 minutes or less. These are an absolute game-changer. You may be surprised at how great these taste!


This recipe can be made as a crispy Indian snack-appetizer or as a perfect side dish with your meal. It is sure to be loved by your friends and family!


This is how my grandmom use to make and now my Mom use to follow the same recipe. I use to observe both of them. My Mom made this recipe just a week back, so I thought about posting this recipe on my blog.


You can use pressure cooker, microwave, instant pot or your regular steamer basket if needed. We are using the regular steamer for steaming taro.


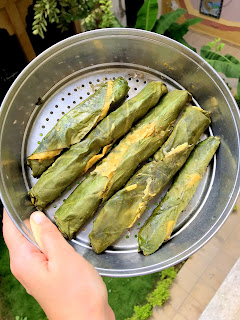
Apply chickpea flour batter on the leaves and tightly roll them up. Now, grease some oil on the steamer and place those leaves on the regular steamer basket, cover it with a lid, steam it for 15-20 minutes or until they are turned golden brown than carefully flip at the other side too. Keep it aside to cool.


You can the slice the colocasia leaves into one inch thick roll than sauté them into the tomato paste, serve it with chapati or enjoy it as a starter.


I make the tomato sauce with no onion and no garlic. Though if you want you can add both onions and garlic.


Arbi kay pattay or taro is a vegetarian dish, served as a side dish or as a light main. This dish can get ready in 45 minutes or less. These are an absolute game-changer. You may be surprised at how great they will taste!


HOW TO MAKE ARBI KAY PATTAY


The process of making Arbi kay pattay is little long as there are various steps involved into it.


1. Preparation - The Colocasia leaves are available in any Asian grocery store or farmer’s market. Just pick the fresh green ones. 

2. Prepare the batter - Wash, dry and trim the stems. Make thick Chickpea flour batter, and apply it on the leaves and tightly roll it up.

3. Steaming - Steam the leaves in a steamer for 15-20 minutes till the colocasia leaves gets nice golden color than carefully flip at the other side too. 

4. Assemble - Keep it aside to cool. When they cool down, slice and cut each taro into 1 inch thick roll.

5. Tempering - Heat a hot pan, stir it by melting a butter into a pan. Add pinch of asafoetida, chopped tomatoes and sauté them for 5 minutes on low flame than add spices like salt, red chilli powder, coriander powder, cumin powder, garam masala and stir-fry them for a minute.

6. Add colocasia leaves - Add arbi kay pattay or taro in the tomato paste and garnish them with cilantro leaves. Mix them to give it a nice flavour and serve it with chapati or enjoy them as a starter!


STEP BY STEP TO MAKE COLOCASIA LEAVES


1. This is how Taro leaves look like. Rinse the leaves first, and pat them dry.


Rinse the leaves first, and pat them dry.


2. In a mixing bowl, add all the ingredients mentioned for the batter - chickpea flour, salt, red chilli powder, coriander powder, carom seeds (ajwain), green chillies, garam masala also squeeze the lemon into it. Add some water slowly to make a thick paste.


This is a chickpea batter which includes chickpea flour, salt, red chilli powder, coriander powder, carom seeds (ajwain), green chillies, garam masala, lime as well . Add some water slowly to make a thick paste.


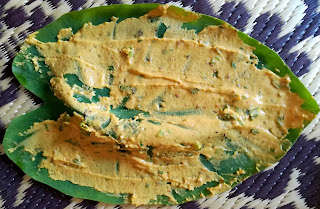
3. Remove the thick stem of the leaves and gently apply the paste using hands preferably spread it all over the leaf and roll it up. Prepare all the leaves like this.


Spread the chickpea batter than roll the colocasia leaves.


4. Repeat these steps for all the 5 leaves and keep them ready.


Repeat these steps for all the leaves.


5. You can use pressure cooker or an instant pot or your regular steamer basket if needed. We are using the regular steamer so grease some oil and place those leaves in the steamer, cover it with a lid, steam it for 15-20 minutes or until they are turned golden brown than carefully flip at the other side too. Keep it aside to cool.


Steam them in the regular steamer basket.


6. When they cool down, cut each taro leaves into 1 inch thick roll.


When they cool down, cut each taro leaves into 1 inch thick roll.


7. For tempering heat a hot pan, stir it by melting a butter in a pan. Add pinch of asafoetida, stir-fry it for a minute. Add chopped tomatoes, sauté for 5 minutes on low flame than add spices like salt, red chilli powder, coriander powder, cumin powder, garam masala and stir-fry them. Add colocasia leaves or taro and mix them in tomato sauce and serve it with chapati or eat them as a starter and enjoy!!


Step by Step Process of making Colocasia leaves or Arbi kay Pattay


ARBI KAY PATTAY OR COLOCASIA LEAVES

Serves : 3-4 People
Preparation Time : 15 minutes
Cooking Time : 30 minutes
Author : The Food Root


For making 5 Arbi Kay Pattay or Colocasia Leaves Recipe

Ingredients

For the Chickpea Batter


½ cup chickpea flour
¼ tsp coriander powder
¼ tsp carom seeds (ajwain)
¼ tsp red chilli powder 
¼ tsp garam masala powder
2 green chillies
Squeeze ½ tsp lime juice
¾ tsp salt (or to taste)


For Tempering


2 tbsp cooking oil
2 tomatoes, chopped
pinch of asafoetida
½ tsp coriander powder
½ tsp cumin powder
½ tsp red chilli powder
¼ tsp garam masala powder
¾ tsp salt (or to taste)
chopped cilantro leaves for garnishing


Preparation


1. Rinse the colocasia leaves and pat them dry.


2. Place another leaf upside down and trim the stem of the leaves.


3. Meanwhile make the chickpea batter. To make the batter - take a big bowl, add all the ingredients like chickpea flour, salt, red chilli powder, carom powder, green chillies, coriander powder, and squeeze half lime juice. Add some water slowly to make a thick paste.


4. Apply the paste all over the leaf using the hands. Prepare all the leaves like this.


5. We are using the regular steamer basket for steaming the leaves. Grease some oil on the steamer and place the leaves on the steamer, cover it with a lid, steam it for 15-20 minutes or until they are turned golden brown than carefully flip at the same time other side too. Keep it aside to cool.


6. Cut each roll into 1 inch thick slices.


7. For tempering heat a hot pan, stir it by melting a butter in a pan. Add pinch of asafoetida stir-fry it for a minute, than add chopped tomatoes, sauté for 5 minutes on low flame or so than and add spices like salt, red chilli powder, coriander powder, cumin powder and stir-fry it for a minute.


8. Add colocasia leaves or taro, garnish with chopped cilantro leaves, mix them to give it a nice flavour and serve them with chapati or you can also enjoy them as a starter!


Notes


1. You can also fry them in a oil after steaming and eat them as a starter.

2. You can also steam colocasia leaves in your regular steamer, microwave, pressure cooker or an instant pot.

3. You can also use a pinch of turmeric powder while cooking arbi kay pattay.

4. Squeezing lime juice in the chickpea batter is totally optional.

5. I make the tomato sauce with no onion and no garlic. Though if you want you can add both onions and garlic. 
Tuesday, December 1, 2020

Mushroom Butter Masala


Mushroom Butter Masala is a delicious dish made from mushrooms, onions, tomatoes, milk, cream and Indian spices.


Mushroom Butter Masala is a delicious dish made from mushrooms, onions, tomatoes, milk, cream and Indian spices.


This is a semi-dry gravy recipe using mushrooms. It’s an easy no-grind mushroom masala recipe. You can easily make this recipe in 30 minutes or less. I love simple gravy recipes where I don’t have to grind anything. There are various variations to make this recipe. You can make this recipe as a fry, gravy, snack or as a filling.


Mushroom Butter Masala recipe is a great accompaniment to any Indian lunch spread. I'm a mushroom lover and have tried this recipe lot of times. It can be mostly eaten with chapatis, naan or with rice. It's a great comfort food and is simplest of them all. I just love the color and the taste. The cream adds the extra flavor. It's a must try recipe, if you are a mushroom lover!! 


Mushroom Masala is a semi-dry gravy recipe using mushrooms. It’s an easy no-grind recipe. You can easily make this recipe in 30 minutes or less.


How To Make Mushroom Butter Masala


You don’t need lot of veggies and spices to make mushroom masala recipe. You can totally experiment with it. The main ingredient of this recipe is mushroom itself. Other than that there are 2 main ingredients of this recipe are are milk and cream. And to make this vegan you can also substitute them with vegan milk, vegan cream and vegan butter.


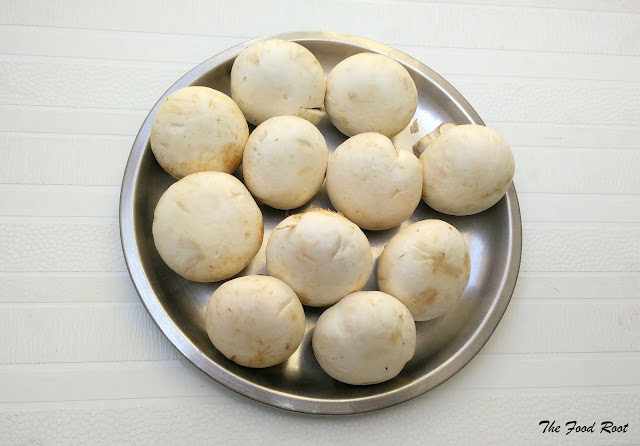
2 cups of mushrooms


Heat butter in a pan. Add garlic, ginger, chopped onions and green chili and sauté until translucent. Add chopped tomatoes in a pan to form a smooth paste. Next, add the mushrooms and sauté until it develops some color. Add all the spices like salt, red chili powder, turmeric powder, coriander powder, garam masala to the cooked mushroom masala. Cover it with a lid. This might take about 4 to 5 minutes. Add milk, and bring to a boil. Add full-fat cream mix well, and cook for one minute or until you get the desired consistency. Garnish with coriander leaves and serve hot.


2 cups of sliced mushrooms


Well just thinking, when these moments will pass? But I do feel it has made us all realize what truly is important in our lives. Hope things get back to normal asap.


Mushroom Butter Masala | Mushroom Makhani


Serves : 3-4 People
Preparation Time : 15 minutes
Cooking Time : 30 minutes
Author : The Food Root


Ingredients 


2 tablespoons Butter
2 cups Mushrooms, chopped
4 Garlic cloves, chopped
2 Green chilis chopped
1-inch piece ginger, grated
2 Onions, chopped
3 medium sized Tomatoes, chopped or grind
1/2 teaspoon Red chili powder
1/2 teaspoon Turmeric powder
1/4 teaspoon Garam masala powder
3/4 teaspoon Coriander powder 
Salt, to taste
1/4 cup Milk
2 tablespoons full-fat Cream
Coriander leaves, for garnish


Preparation 


1. Heat butter in a non-stick pan.

2. Add garlic and ginger and sauté for about 2 minutes.

3. Add chopped onions and green chili and sauté until translucent or for about 3-4 minutes.

4. Meanwhile, add the chopped tomatoes in a pan to form a smooth paste.

5. Next, add the mushrooms and sauté until it develops some color.

6. Add all the spices like salt, red chili powder, coriander powder, turmeric powder to the cooked mushroom masala. Cover it with a lid. This might take about 4 to 5 minutes.

7. Add milk, and bring to a boil. This will take another 2-3 minutes.

8. Add full-fat cream, and garam masala, mix well, and cook for one minute or until you get the desired consistency.

9. Garnish with coriander leaves and serve Mushroom Butter Masala hot with rice or chapatis.


Notes:


1. You can also substitute non dairy milk, non vegan butter, non dairy cream with the vegan options. There are various options available in the market.

2. If you want to skip onions and garlic from the recipe, you definitely can.


Saturday, October 31, 2020

Kheer or Rice Pudding


Kheer or Rice Pudding prepared with the goodness of rice, milk, sugar, and garnish with crushed cardamom, dry fruits and nuts like pistachios, cashews and raisins.


Kheer or Rice Pudding prepared with the goodness of rice, milk, sugar, and garnish with crushed cardamom, dry fruits and nuts like pistachios, cashews and raisins.


Rice Kheer is easy to make, and is a one pan method. My family loves this recipe specially my brother. You can serve it both warm and and chilled and keep the leftover rice kheer in the refrigerator.


Kheer is generally made on the Sharad Purnima which is a harvest festival celebrated on the full moon day, marking the end of the monsoon season. It is considered to be the birthday of Goddess Laxmi. This year Sharad Purnima is falling on 30 October 2020.


As per ritual, kheer is left overnight in the moonlight and believe that the rays of the moon on Sharad Purnima has special healing properties. The next day it is consumed and distributed as prasad.


Kheer or Rice Pudding prepared with the goodness of rice, milk, sugar, and garnish with crushed cardamom, dry fruits and nuts like pistachios, cashews and raisins.


Kheer or Rice pudding is a popular dessert across the country as it is quick and easy to make. It can also be prepared on the holidays or special occasions like Diwali which is coming after a week or two.


Here is an easy recipe which you can give it a try. Write down in the comments below what you think about this recipe.


Kheer or Rice Pudding prepared with the goodness of rice, milk, sugar, and garnish with crushed cardamom, dry fruits and nuts like pistachios, cashews and raisins.


Kheer or Rice Pudding


Serves : 6 People
Preparation Time : 15 minutes
Cooking Time : 1 hour
Author : The Food Root


Ingredients


1 litre full fat milk
1/4 cup basmati rice
1/2 cup of sugar
Garnish it with crushed cardamom or your favorite choice of dry fruits or nuts like pistachios, cashews and raisins


Method


1. Rinse basmati rice with water to remove excessive starch.

2. Then soak the basmati rice for at least 15-20 minutes.

3. Take a deep pan and boil the milk on low flame.

4. Add rice and boil the milk and rice on low flame. 

5. You can add 1 cup of water, this step is totally optional.

6. Now keep stirring the rice, milk and water (in case if you added) so that the milk does not stick to the bottom of the pan.

7. Continue to cook on the stove, and keep stirring it on low flame. 

8. Now when you realise that the kheer is almost 80% cooked, add sugar.

9. Keep stirring sugar for next 10 minutes or till it turns light brown.

10. Turn off the flame, and add cardamoms and your favourite nuts by slicing them.

11. You can also garnish the rice kheer by these dry fruits.

12. Serve it both warm or chilled and keep the leftover rice kheer in the refrigerator.


Notes :


1. Use basmati rice (or kheer wale chawal) as they are the best to make Kheer or Rice Pudding.

2. Use condensed milk in the kheer as it helps in making your kheer more sweet.

3. You can also add brown sugar instead of white if you want.

4. Adding 1 cup of water while boiling rice and milk together, is totally optional. (This trick of adding water helps as the mixture of rice pudding begins to thickens a lot.)

5. You can also garnish it with saffron strands.

6. In case you like cardamoms or dry fruits, you can slice them and add them in the kheer.

7. You can serve the kheer both warm or chilled and keep the leftover rice kheer in the refrigerator.


Wednesday, October 28, 2020

Lemon Pickle With No Oil and No Cooking


Lemon Pickle With No Oil and No Cooking


Lime pickle is a traditional Indian condiment made with lemons and spices, adding oil and cooking with extra spices is a choice. Lemon Pickle is also known as “nimbu ka achar” in Hindi. It’s a popular condiment served in India. Lemon Pickle With No Oil and No Cooking is quick and easy recipe and tastes great.


Lemon pickle is made with few basic ingredients like coriander powder, red chilli powder, turmeric, asofoetida, sugar, salt, and of course lemons. It’s a no-fuss pickle recipe. You don’t need to pan-fry any extra spices so which we usually do in these kind of Indian lemon pickles, so No Oil or No cooking or pan-frying any other spices.


You can also add sugar which is optional. Try them with juicy lemons. Regular lemons will also do. It’s a delicious condiment and I am sure you’ll love it. 


Lemon pickle recipe is one of the most easiest pickle recipe which any beginner can also make as it requires no oil and no cooking so do try this and let us know how you like it. You can also pin the recipe :- 


Lemon Pickle With No Oil and No Cooking


Lemon Pickle With No Oil and No Cooking


Serves : 4 People
Preparation Time : 15 mins
Total Time : 15 mins
Author : The Food Root


Ingredients 


10 medium sized lemons
1 tbsp crushed coriander powder
1 tbsp red chilli powder
1 tbsp turmeric powder
1 tbsp asafoetida powder 
1 tbsp sugar (optional)
2 tbsp salt or as per your taste


Method


1. Rinse 10 lemons with water and dry with a soft cloth.

2. Cut the lemons like this, in four sides or however you feel like.

3. Make a pickle mix - add 2 tbsp salt, 1 tbsp crushed coriander powder, 1 tbsp red chilli powder, 1 tbsp turmeric powder, 1 tbsp asafoetida powder, and stir it well till the moisture goes away.

4. Add 1 tbsp sugar (optional), to avoid bitterness

5. Add lemons in the pickle. Squeeze 2-3 lemons and add the lemon juice over the pickle. Sprinkle some salt about 1 tsp all over the lemons.

6. Cover the jar with a lid and keep it in the sunlight for 5-6 days till it get matured. Shake the jar well, everyday. This is done so that the lemon pickle does not get spoilt.

7. Refrigerate the pickle. This tangy lemon pickle will be ready after 5 to 6 days.


Notes :


1. Use fresh and juicy lemons.

2. Avoid using lemons which have become discolored from outside.

3. Keep the pickle in sun for 5 to 6 days or till it has become soft and matured. Everyday, shake the jar well. 

4. After 5 to 6 days, refrigerate lemon pickle so that it has a longer shelf life.

5. Sprinkle some salt about 1 tsp all over the lemons. This is done so that the lemon pickle does not get spoilt.

Sunday, September 27, 2020

Immunity Booster Kadha Recipe | Ayurvedic Immunity Booster Kadha


Immunity booster Kadha Recipe | Ayurvedic Immunity Booster Kadha

Ayurvedic Immunity-booster Kadha is a mixture of various herbs and spices like, Basil leaves, Cinnamon, Black Cardamoms, Giloy, Liquorice, Ginger, Black peppercorns, Fennel seeds, Rock Salt and Jaggery or Honey boiled in water until it releases its aroma and flavour into it. 


1. Ayurvedic Immunity-booster Kadha Recipe


With the rise of COVID-19 cases, there has been a rise in consumption of Ayurvedic remedies and herbal immunity boosters in India and all over the world. There are many people who are consuming and sharing health-boosting kadhas these days and guess what, it’s working for them.


2. How to make Immunity-booster Kadha?


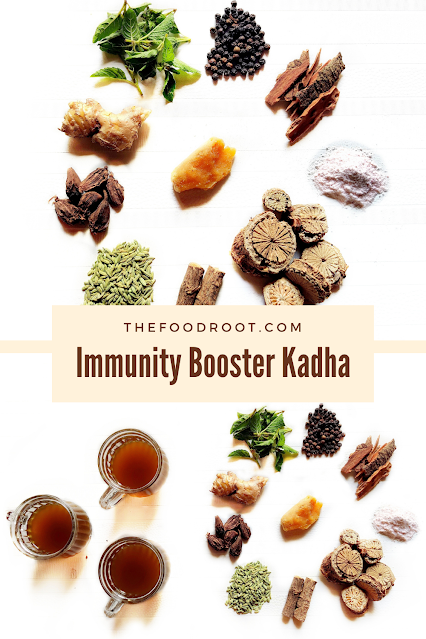
These are those powerful herbs and spices which I added to make this Ayurvedic immunity-boosting kadha. 8-10 Tulsi leaves, 1/2 stick Cinnamon, 2 Black Cardamoms, 2 Giloy, 1/2 inch stick Liquorice (mulethi), 1 inch Ginger, 1/4 tsp Black peppercorns, 1/2 tsp - Fennel seeds. Coarsely ground them into a mortar and pestle. 

Boil it in 5 cups of water until the colour turns light brown. This will take 5-6 minutes on medium heat. Then let it boil on simmer for at least 15-20 minutes or boil till you reach the desired consistency. Then, add 1/4 tsp of rock salt (optional) and jaggery, sugar or honey as per your taste and in a cup and strain. Sip it warm.


Immunity Booster Herbs


3. Health benefits of herbs that are the healthy staples of Ayurvedic Immunity-booster Kadha


Tulsi leaves is used in the treatment of various diseases like skin disorders, diabetes, bronchitis, cardiac, stomach, chest and respiratory problems. It is also acts as a effective pain killer. Regular consumption of tulsi helps in relieving the joint pains.

Black Cardamom is dark brown in color. It is in the form of seed pods. It gives likes minty like aroma smoky flavour. It has anti-inflammatory properties and is loaded with antioxidants. 

Giloy helps in removing toxins, purifying blood, fights bacteria that causes diseases and also combats liver diseases. It also helps in reduces stress and anxiety. It may be helpful in treating diabetes and respiratory system.

Cinnamon is loaded with powerful medicinal properties. It has anti-inflammatory properties and is loaded with antioxidants. It may cut the risk of heart disease. It helps in lowering down blood sugar levels.

Mulethi helps in recovering stomach  infections like cold and cough and to high sugar and blood pressure. It reduces the risk of pain and headache. It is beneficial in the treatment of cancer and diabetes

Ginger is a hot and fragrant spice usually chopped or powdered. It's a powerhouse root due to its multi -faceted remedies. It reduces nausea and vomiting, treats morning sickness and helps in preventing the stomach ulcer. It regulates the blood sugar level and synthesis the bone tissue. 

Black Peppercorns helps in getting rid of cough and cold and helps in keeping the lungs healthy. It helps up in boosting up the immunity. It reduces the risk of pain and headache and helpful in managing arthritis.

Fennel seeds strengthen the immune system and thus protect against many other infections. It helps in regulating blood pressure, purifying blood, great for acne, and improving eyesight.


4. What is a Kadha & how can it protect you against Covid-19?


Ayurvedic Immunity-booster Kadha is a mixture of various herbs and spices like, Basil leaves, Cinnamon, Black Cardamoms, Giloy, Liquorice, Ginger, Black peppercorns, Fennel seeds, Rock Salt and Jaggery, boiled in water until it releases its aroma and flavour into it. 

These herbs acts to strengthen the immune system and thus protect against many other infections including coronavirus. There are many kadha recipes that involve a different combination of herbs. Here is one which I have shared:

But do not to simply rely on kadha, also practice social distancing guidelines, wear a mask to protect from coronavirus, wash your hands often for atleast 20 seconds, clean and disinfect your houses and monitor your health daily. 


Pin it if you like our recipe and let us know how you like this ayurvedic tea in the comments below;


Immunity Booster Kadha


IMMUNITY BOOSTER KADHA RECIPE


Serve : 3 People
Preparation time : 5 minutes
Total time : 20-25 minutes
Author : The Food Root


Ingredients


5 cups Water
8-10 leaves - Holy basil (Tulsi leaves)
1/2 stick Cinnamon (Dalchini)
2 - Black Cardamom (Badi Eliachi)
2 - Tinospora Cordifolia (Giloy)
1/2 inch stick - stick Liquorice (Mulethi)
1 inch - Ginger or Dry ginger powder
1/4 tsp - Black peppercorns (Kali mirch)
1/2 tsp - Fennel seeds (Saunf)
1/4 tsp - Rock salt (optional)
A pinch of Jaggery or Honey as per taste


Method


1. Add 8-10 Tulsi leaves, 1/2 stick Cinnamon, 2 Black Cardamoms, 2 Giloy, 1/2 inch stick Liquorice (mulethi), 1 inch Ginger, 1/4 tsp Black peppercorns, 1/2 tsp - Fennel seeds. Coarsely ground them into a mortar and pestle. 


2. Boil it in 5 cups of water until the colour turns light brown. This will take 5-6 minutes on medium heat. 

3. Then let it boil on simmer for at least 15-20 minutes or boil till you reach the desired consistency. 

4. Then, add 1/4 tsp of rock salt (optional) and jaggery or honey as per your taste and in a cup and strain. Sip it warm.


Notes


1. You can add dry ginger powder instead or grated ginger.

2. Add rock salt, as per your taste. It’s totally optional.

3. You can add jaggery, sugar or honey according to your taste.


Saturday, September 19, 2020

Homegrown Bananas


Nothing beats the joy of growing your own produce. These are the two big bunches of homegrown bananas and yet many more to come.


Nothing beats the joy of growing your own produce. These are the two big bunches of homegrown bananas and yet many more to come.

We planted our banana tree few years ago and since then it’s giving us bunches of bananas every year in our backyard garden.

As it’s raining here in India and we have been producing lots of bananas. We just gave away a huge basket full of bananas to my aunt and neighbours and there is one more basket which is in the kitchen. They taste so good like the pineapples.


Homegrown Bananas


Well to grow these banana plantains, I did nothing much. Simply feed it with fertiliser and mulch with compost which has lots of manure. Please keep in mind that bananas do require lot of sunlight and watering. Also, do not forget to trim down the banana leaves. These were grown in our backyard, so today we got stuck into the thinning down this overgrown tree.

Well, I have been keeping myself occupied everyday in the lockdown period. I was trying my hands on gardening as my gardener wasn’t coming so I was busy either making new recipes or helping my mother in gardening.


Homegrown Bananas


Most people have some extra time on their hands, so don’t panic in such pandemic situations instead stay calm and do what makes you happy like trying out new recipes, opting for some new hobby, going for LIVE session on Instagram, gardening or just talking and relaxing with your friends and family.

Enjoy the little things in life because one day you'll look back and realize they were the big things. What are you doing during this lockdown? Let me know in the comments below.

Also, if you like this post do pin it ;


Homegrown Bananas


Saturday, August 1, 2020

Homemade Plantain Chips | Raw Banana Chips


Snacking on the plantain chips which I made yesterday. It’s a mouth watering traditional dish of Kerala. Crispy banana chips, deep fried in coconut oil, seasoned with salt and black pepper. You can deep fry, pan-fry, air-fry, roast or bake them and pair it with your favourite salsa dip or enjoy them as it is.


Crispy banana chips, deep fried in coconut oil, seasoned with salt and black pepper. You can pan-fry, air-fry, roast or bake them and pair it with your favourite salsa dip or enjoy them as it is.


I made a small batch of plantain chips yesterday. It is such a simple recipe that you’ll be amazed to know that it can be made in less than 10 minutes. I made these raw banana chips from my homegrown banana tree. I love how fresh, beautiful produce which is growing in our backyard can feeds our family.

Let’s check out the recipe. Take raw bananas, wash and peel them and chop the bananas into the round shape. Grease your hands with oil before peeling. Heat oil in a pan and deep fried the banana slices for 2-3 minutes. Season it with salt and pepper, mix well.

If you like this recipe pin this picture below, thanks!


How to make Homemade Plantain Chips


Homemade Plantain Chips | Raw Banana Chips


Serve : 2-3 People
Preparation time : 5 minutes
Total time : 8-10 minutes
Author : The Food Root


Ingredients

4 Raw Bananas
1/2 tsp salt
1/2 tbsp black pepper
Oil for frying


Method

1. Grease your hands with oil and peel raw bananas chop them into slices.


Grease your hands with oil and peel raw bananas chop them into slices.


2. Heat oil in a pan and deep fried the banana slices for 2-3 minutes.


Heat oil in a pan and deep fried the banana slices for 2-3 minutes.


3. Season it with salt and pepper, mix well.


Crispy raw banana chips deep fried and seasoned with salt and black pepper.


Notes

1. You can thinly slice them, it can in any shape, long or round shape

2. You can deep fry, pan-fry, air-fry, roast or bake them and pair it with your favourite salsa dip or enjoy them as it is.


It’s all about finding calm amidst the chaos.. I know during this lockdown period lot of people are getting anxiety attacks and are getting depressed but see the brighter side to it, as time slows down you can rejuvenate and be grateful to do all your favourite things.

Lately, gardening has been my escape from the stress of quarantine life where I can show my experiences. What is yours? What are you doing during this lockdown period? Let me know in the comments below.

Tuesday, June 30, 2020

3-Ingredient Chocolate Cake | Easy Cake Recipe For Beginners


Indulge in this 3-Ingredient Chocolate Cake! This Chocolate Cake is made with just 3 Ingredient - chocolate cookies, milk, and baking powder. It's an Easy Cake Recipe For Beginners. It’s rich, light, moist, decadent and chocolaty. Yes, this is the dessert which I made for my mom's birthday.


3 Ingredient chocolate cake is made with chocolate cookies, milk, and baking powder.  It's an Easy Cake Recipe For Beginners.


I surprised my Mom with this cake on her birthday. And, she was so happy with the homemade cake which I prepared for her. It's a great lockdown cake recipe.

I didn’t like this shot much but everything was made at last moment, I just got 2 minutes to click this before we gobbled up this cake that taste heavenly.

I made this recipe with these 3 ingredients - chocolate cookies, milk, and baking powder. Yes, you heard me right, we made this cake without any flour, eggs, sugar or cocoa powder.

I tried making this type of cake for the very first time, but guess what, it turns out to be delicious. My brother helped me too as i was making this cake at the very last moment.

These are the basic cake recipes for beginners. Also in the lockdown period this can be made with whatever few ingredients which are available at your place. 

It's an easy chocolate cake recipe for beginners which y'all can make. This is a no-fuss dessert which can be made with just few ingredients. It's a great recipe for those who don't eat eggs, basically it's an eggless chocolate cake made with just 3 ingredients. It’s my first attempt to this recipe so it’s probably not perfect, though everyone just loved it. It was truly delightful.


Indulge in this 3-Ingredient Chocolate Cake! This Chocolate Cake is made with just 3 Ingredient - chocolate cookies, milk, and baking powder. It's an Easy Cake Recipe For Beginners.


Easy Cake Recipe For Beginners


Homemade Chocolate Cake Recipe


So if you want to make this birthday cake in lockdown follow this method.

1. Process chocolate cookies in a blender or a food processor, choose the more chocolaty and crispy cookies as it will give a flavourful taste to the cake. I used 2 different types of cookies, bourbon and good-day.

2. Add the chocolate cookies powder into a big bowl. Next, add 2 1/4 tbsp baking powder to it, which helps in giving the rise and roughly mix it. Pour 3 1/2 cups of warm milk into it and whisk until smooth and combined. 

3. Preheat the oven to 340 degrees F or 170 degree C. Pour the cake batter in the greased 7’’ pan. Grease pan with butter and line the bottom with the parchment paper.

4. Now, pour the cake batter into the greased pan. Bake it for around 12-15 minutes or until the toothpick comes out clean. Do not overbake this cake.

5. Allow it to cool down for 10 minutes, turn it over. Remove the paper and your 3 ingredient flourless chocolate cake is ready.

6. For cake frosting, you can either spread nutella on the cake, or make chocolate frosting recipe or can also make a chocolate ganache recipe.

7.  Well, I went with my gut and made a hot chocolate ganache recipe and pour it on the cake and decorated with grated chocolate and thankfully it turns out to belicious


For Chocolate Ganache, we need to cut 1 cup of dark chocolate in small chunks. Next, add those chocolate chunks in a large bowl. Than, add 2 tbsp butter, 1 tbsp sugar and melt it on a double boiler, as it cools down pour 1 cup of lukewarm milk and whisk until it’s smooth and combined. Pour hot chocolate ganache on the cake. Decorate the cake with some grated chocolate, freeze it for an hour and serve this rich, moist Chocolate Ganache Cake to your family or guests.


Note*  Though ganache can become really hard when you keep it in a refrigerator for more than 4 hours but since I have to serve it fast and I have to keep this dessert in a fridge for just 1 hour so Chocolate Ganache was perfect recipe for this dessert else I would have gone for chocolate frosting recipe.


Not just my mom, my whole family loved this cake. She was never a fan of desserts, but when I made this cake for her, she ate a lot of it and I never saw her more happier.


3 Ingredient Chocolate Cake


Lockdown Cake Recipe


Serve : 6-7 People
Preparation time : 30 minutes 
Baking time : 15 minutes
Author : The Food Root


Ingredients 

3 cups of chocolate cookies (1 large packet of Bourbon and 1 small packet of good-day cookies)
3 1/2 cups of warm milk
2 1/4 tbsp baking powder

Method

1. Chop the 3 cups of chocolate cookies roughly with hand and process it in a blender or a food processor. 

2. Add the chocolate cookies powder into a big bowl. Next, add 2 1/4 tbsp baking powder to it, which helps in giving the rise and roughly mix it. Pour 3 1/2 cups of warm milk into it and whisk until it’s smooth and combined.

3. Preheat the oven to 340 degrees F. Use 7 or 8 inch pan. Grease pan with butter and line the bottom with parchment paper.

4. Now, pour the cake batter into the greased pan. Bake it for around 12-15 minutes.

5. Allow it to cool down for 10 minutes, turn it over. Remove the paper and 3 Ingredient Chocolate Cake is ready.


Chocolate Ganache


Ingredients

1 cup chocolate cut in small chunks + 1/2 cup grated chocolate 
2 tbsp butter
1 tbsp sugar
1 cup warm milk

Directions

1. We need to cut 1 cup of dark chocolate in small chunks. 

2. Next, add those chocolate chunks in a large bowl. Than, add 2 tbsp butter, 1 tbsp sugar and melt it on a double boiler, as it cools down pour 1 cup of lukewarm milk and whisk until it’s smooth and combined. 

3. Now your Ganache is ready. Pour hot chocolate ganache on the cake. 

4. Decorate the cake with some grated chocolate.

5. Freeze it for an hour and serve your lockdown cake recipe.


Wednesday, June 24, 2020

21 Most Famous Food Quotes


Are You looking for the best inspirational food quotes? Without further ado, here are the 21 Most Famous Food Quotes that encourages you in some way or the other.


The best inspirational food quotes that encourages you in some way or the other.


1. “I can’t stand people who do not take food seriously.”

— Oscar Wilde


I can’t stand people who do not take food seriously.


2. “Drink heavily with locals whenever possible.”

— Anthony Bourdain


Drink heavily with locals whenever possible.


 3. “Champagne is one of the elegant extras in life.”

— Charles Dickens


Champagne is one of the elegant extras in life.


4. “You learn a lot about someone when you share a meal together.”

— Anthony Bourdain


You learn a lot about someone when you share a meal together.


5. “A gourmet who thinks of calories is like a tart who looks at her watch.”

— James Beard


A gourmet who thinks of calories is like a tart who looks at her watch.


6. “Life is too short for cuisine minceur and for diets. Dietetic meals are like an opera without the orchestra.”

— Paul Bocuse


Life is too short for cuisine minceur and for diets. Dietetic meals are like an opera without the orchestra.


7. “Until I discovered cooking, I was never really interested in anything.”

— Julia Child


Until I discovered cooking, I was never really interested in anything.


 8. “Food is not rational. Food is culture, habit, craving and identity.”

— Jonathan Safran Foer


Food is not rational. Food is culture, habit, craving and identity.


9. “I think the most effective way to run a kitchen is to teach, not to just yell.”

— Tom Colicchio


I think the most effective way to run a kitchen is to teach, not to just yell.


10. “I always try to tell a story to the guest on the plate, I want the plate to speak about me, the other rule is generosity: Food is about sharing something which is inside you, giving a little bit of you.”

— Helene Darroze


I always try to tell a story to the guest on the plate.


11. “I maintain standards and I strive for perfection. That level of pressure is conveyed in a very bullish way and that's what cooking is all about.”

— Gordon Ramsay


I maintain standards and I strive for perfection in cooking.


12. “Cooking is like love. It should be entered into with abandon or not at all.”

— Harriet van Horne


Cooking is like love. It should be entered into with abandon or not at all.


13. “Cooking is one of the great gifts you can give to those you love.”

— Ina Garten


Cooking is one of the great gifts you can give to those you love.


14. “Cooking is all about people. Food is maybe the only universal thing that really has the power to bring everyone together. No matter what culture, everywhere around the world, people eat together.”

— Guy Fieri


Food is maybe the only universal thing that really has the power to bring everyone together.


15. “People want honest, flavourful food, not some show-off meal that takes days to prepare.”

— Ted Allen


People want honest, flavourful food, not some show-off meal that takes days to prepare.


16. “If you can't feed a hundred people, then just feed one.”

— Mother Teresa


If you can't feed a hundred people, then just feed one.


17. “Life is uncertain. Eat dessert first.”

— Ernestine Ulmer


Life is uncertain. Eat dessert first.


18. “People who love to eat are always the best people.”

— Julia Child


People who love to eat are always the best people.


19. “Recipes tell you nothing. Learning techniques is the key.”

— Tom Colicchio


Recipes tell you nothing. Learning techniques is the key.


20. “A recipe is a story that ends with a good meal.”

— Pat Conroy


A recipe is a story that ends with a good meal.


21. “Oh, I adore to cook. It makes me feel so mindless in a worthwhile way.”

— Truman Capote


Oh, I adore to cook. It makes me feel so mindless in a worthwhile way.


So read these Famous Food Quotes by Chefs and Writers to channelise your inner chef. Also, let us know how you like these Famous Food Quotes Proverbs in the comments below.