Sunday, December 31, 2017

MY TOP 10 RECIPES OF 2017

The end of the year can be a good time to reflect on achievements, no matter how big or small. I am glad I started blogging so that I connected with many of you on personal level. Thank you for your support and sticking around.

Today, I would like to share 10 of my favorites food recipes with you. These are my personal go to recipes. They all are my favorites, so I cannot choose one. What are you craving for 2018?

1. Sautéed broccoli and bell peppers Sautéed broccoli and bell peppers is an incredibly appetizing and delicious side dish that goes well with steamed rice and a vegetable platter. This colorful side dish is perfect for holidays and dinner parties!! 

Continue to the recipe...

Sautéed broccoli and bell peppers is an incredibly appetizing and delicious side dish that goes well with steamed rice and a vegetable platter.


2. Dry Fruit Custard : We all know that dessert is the best meal of the day. Whether you're planning to make a dessert for big dinner party or for your family, it's a sweet treat at the end of your luscious dinners. One such delicious dessert is dry fruit custard.

Continue to the recipe...

there is nothing more pleasurable than digging into a bowl of chilled vanilla dry fruit custard.


3. Vegetable Fried-Rice : Vegetable fried rice is a Chinese dish of cooked rice, mixed with vegetables, sauces and spices that has been stir fried in a frying pan. It's one of the most popular Chinese dishes, consumed mainly in Asia and Middle East regions. It's often served as a complete dish or can also be enjoyed with fresh yogurt, salad or your favorite curry!

Continue to the recipe...

this hearty and wholesome one pot meal dish is loaded with garden fresh veggies, vinegar, dark soy sauce and assorted spices.


4. Pistachio Ice-Cream : Churned with generous amount of pistachios and dusted with almonds, this is hands down the best homemade pistachio ice cream you'll ever eat. It's thick, creamy and provides much joy when the climate doesn't.

Continue to the recipe...

this ice cream is made with 4 main ingredients - milk, cream, sugar and tons of pistachios.


5. Vegetable Hakka Noodles : Hakka Noodles is an easy Indian-Chinese recipe which combines the goodness of colorful veggies and sizzling sauces! It's basically a fusion between Indian flavors and Chinese Noodles. This is a must try recipe for the chilli lovers. These Noodles are super easy to make and they taste delicious.

Continue to the recipe...

colorful fusion of indo chinese noodles, a must try recipe for the chilli lovers


6. Panch Phoran Okra : Crispy okra, delicately tempered with the panch phoran, the aromatic Bengali spice mix combined with garden-fresh tomatoes! Panch Phoran mix makes a showstopping addition in this recipe. It enhances the flavor and completely transform the character of the dish. It's a ridiculously simple and tempting dish.

Continue to the recipe...

Crispy okra, delicately tempered with the panch phoran, the aromatic Bengali spice mix combined with garden-fresh tomatoes!


7. Rainbow Buddha Bowl : This satisfying bowl of goodness is  filled with cooked rice, boiled red beans, blanched broccoli, roasted bell peppers and sliced cucumber. I combined this with the almond butter lime dressing  to give it a touch of sweetness and it just turned out perfect!

Continue to the recipe...

Buddha bowl is healthy, filling meal. It is usually composed of grains, proteins and veggies.


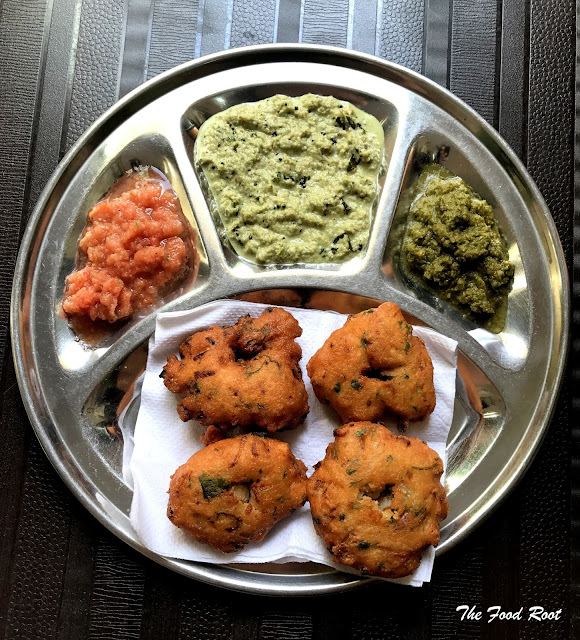
8. Medu Vada - The Indian Savory Doughnut : Medu vadas are one of the most famous breakfast item across South India. They are made by split black lentils (urad dal) batter and deep-fried in a doughnut shape savory fritters. They are crunchy and crispy on the outside and soft on the inside.

Continue to the recipe...

Medu vada is a doughnut shape savory fritter that is made by split black lentils (urad dal) batter, filled with veggies and spices, and, than deep-fried in a vegetable cooking oil. These fritters are crunchy and crispy on the outside and soft on the inside.


9. Mediterranean Chickpea Salad : Filled with cooked chickpeas, cherry tomatoes, crisp cucumber, fresh beets and tossed in a vinaigrette flavored dressing with cumin and dijon. This recipe is completely vegan and gluten-free. I'm totally obsessed with this recipe.

Continue to the recipe...

This Mediterranean Chickpeas salad was a pure bliss. It has all my favorite Mediterranean flavors. Bring in a large bowl, combine cooked chickpeas and your favorite veggies. Pour cumin-dijon vinaigrette flavored dressing over it and toss it well. Season with salt and pepper, and enjoy!


10. Garden Fresh Tomato Soup : I'm little obsessed with tomato soup. I could probably eat it everyday and never get bored. The beauty of this soup is, it fills you up so you eat less. This soup has so much flavors that you will never buy a canned one again. This easy homemade recipe is filled with just 3 basic ingredients - garlic, carrots, and lots of home picked tomatoes.

Continue to the recipe...

Tomato soup cooked in a pressure cooker. Add veggies in the cooker, boil it and then strain off the liquid. Blend the solid contents and return it to pan. Add strain water, fresh water and cook it for 30 minutes. Season it with salt and pepper. Stir in some cream until you reach the desire texture.


Which is your favourite recipe? What often do you cook at home? Which one would you like to try?

I hope you enjoy this post... We are just couple of hours away from welcoming 2018!! I hope the new year brings lot of happiness in our lives!! Wishing you and your loved ones a very very Happy New Year!!!

Tuesday, December 19, 2017

HOW TO MAKE SPROUTED MOONG BEAN SALAD

Moong sprouts salad is an easy and nutritious snack. You can be make the salad by adding moong sprouts, cucumber, tomatoes, onions, a sprinkle of chat masala, tossed in a vinaigrette flavored dressing - and it tastes extremely great. Enjoy experimenting with different flavors, vegetables, fruits, spices, dry-fruits, nuts and seeds of your choice. It will boost the nutritive value of your salad.

A super busy day calls for a salad!!! There is no denying that at times we all look for fast, easy and no-fuss recipes with full of nutrients and flavor. Whenever I am in a hurry, I prepare eating sprout salads in the breakfast. It's a quick fix for low calories and flavor and great for people who don't have enough time to cook healthy meals. There are different types and varieties of sprouts but moong sprouts are my favorite.

Sprouts are energy boosting enzymes, extremely alkalizing and rich in micro-nutrients. They are loaded with protein, vitamin B1 and B6, vitamin K and minerals such as magnesium, calcium, phosphorous and zinc.

I kept it super simple today, this took me less than 5 minutes to prepare! Moong sprouts, cucumber, tomatoes, onions, a sprinkle of chat masala (salt, cumin and pepper), tossed in a vinaigrette flavored dressing - and it tastes extremely great. Enjoy experimenting with different flavors, vegetables, fruits, spices, dry-fruits, nuts and seeds of your choice. It will boost the nutritive value of your salad.

You can buy ready-made sprouts from the market or make them at home but it's always good and healthy option to make sprouts at home. The sprouts can be made ahead of time and simply boiled for 5 minutes right before serving.


wash and soak the beans for 6-8 hours in the morning, drain away the excess water and rinse it with fresh water. Wrap the swelled beans in a wet cloth and let soak in a cool place overnight and wait for atleast a day. After 24-36 hours they will properly sprouted.


HOW TO SPROUT MOONG BEANS?

1. Wash and rinse 1 cup of moong beans under running water.
2. Add cold water, preferably 2-3 times the volume of the beans, cover and place it in a bowl.
3. Soak the beans for 6-8 hours, depending upon the type and size of the seed, so that they swell properly.
4. Drain away the excess water from the bowl. Rinse them with fresh water and drain the water again.
5. Place the swelled beans and wrap it in a wet cloth.
6. Let soak in a cool place overnight and wait for atleast a day.
7. After 24 - 36 hours they will be properly sprouted (rinse and drain the beans after every 6-8 hours)
8. When the sprouts reach the desire length, they are ready to eat.

Notes:
1. Remember to wash the beans atleast 2-3 times a day.
2. After sprouting you can store them in a refrigerator and eat them in less than 3-4 days.


HOW TO MAKE SPROUTED MOONG BEAN SALAD?

Preparation time: 5 minutes
Cooking time: 5 minutes
Serves: 4-5 people
Author: The Food Root

Ingredients
1 cup sprouted moong beans
1 tomato, finely chopped
1 onion, finely chopped
1/2 cucumber, finely chopped
1/2 teaspoon salt or as per taste
1/4 teaspoon black pepper, freshly grounded
1/4 teaspoon cumin powder

DRESSING
Ingredients
3 tablespoon extra virgin olive oil (optional)
2 tablespoon vinegar (balsamic, apple, white cider, wine)
of your choice - I used balsamic vinegar
1/2 teaspoon salt or as per taste
1/4 teaspoon black pepper, freshly grounded

Method
1. Prepare sprouts: Place spouts in a pan with water and salt, cover and boil for 5 minutes or until crisp or tender. Drain the water in a colander and let it sit out at the room temperature.

2. Chop raw veggies: Meanwhile, cut vegetables of your choice and keep it aside.

3. Dressing: Mix all the ingredients in a bowl, whisk together. If you are not using the dressing right away, cover and refrigerate it in a bottle, and shake again before use.

3. Assemble: Assemble your salad bowl, add moong sprouts, raw veggies and season it with salt, pepper and cumin powder. Drizzle the yummy dressing and gently toss them to combine. Enjoy!!


Sunday, November 19, 2017

STUFFED JAPANESE AUBERGINE

These beautiful Japanese aubergine are baked at 350 degress F for 15 minutes and filled with delicious stuffing of ginger, garlic, sauteed tomatoes, aubergine and a host of spices!


This season my garden harvested heaps of gorgeous Japanese aubergines. We had lot of fun sharing it with our neighbours and making some delicious tasty recipes with these beauties. Japanese eggplants are long and narrow with edible seeds. They are generally less bitter and more tender than the other varieties of eggplants.

These beautiful Japanese aubergines are stuffed with the delicious mixture of ginger, garlic, tomatoes, aubergine and a host of spices! You can also add vinegar and/or soy sauce in the ratio of 1:1 to get the extra flavor, but that's totally optional. This dish not only look beautiful but taste amazingly good! You can serve them as an appetizer or as a side dish.

It's a simple, quick and healthy side dish which is low in cholesterol and rich in antioxidants, magnesium, potassium and dietary fiber.

Last weekend, my Mom cooked these stuffed aubergines for the entire family. I ate one of these babies and it was so good. It has a wonderful crispy crust on the outside and on the inside it is delicious creamy and soft.

To prepare the dish, preheat the oven to 350 degrees F. Brush the eggplants with oil and place in a baking dish. Cover with foil and bake for about 15 minutes or tender. Meanwhile to make the stuffing, add olive oil in a pan and fry ginger and garlic and stir. Add tomatoes and green chillis, stir for about 4 minutes. Using a spoon, scoop out the flesh of the eggplant and add it into the pan. Add all the spices and stir it well. Drizzle some soy sauce or/and vinegar to get the extra flavor, but that's optional. Now, give it a good stir and switch off the flame. Fill in the aubergines with the stuffing and serve warm or at room temperature with lemon squeezed over.

They can also be cooked in a gas stove. Just add oil in a pan and rotate these aubergines till it turn soft and tender. Then fill the stuffing in the aubergine and serve.

Give this a try! you will surely love it!
Happy weekend!!


STUFFED JAPANESE AUBERGINE

Serves: 3 people
Preparation time: 10 minutes
Cooking time: 20-25 minutes
Author: The Food Root

INGREDIENTS

4 eggplants -  cut them in half lengthwise
3 large tomatoes, finely chopped
1/2 inch - ginger, grated
4 cloves - garlic, finely minced
2 green chillis, chopped
1/2 teaspoon - turmeric powder
1/2 teaspoon - cumin powder
1/4 teaspoon - red chilli powder
1/2 teaspoon - salt or as per taste
1/2 teaspoon - soy sauce (optional)
1/2 teaspoon - vinegar (optional)
1 teaspoon - lemon juice (optional)
fresh coriander leaves, chopped

DIRECTIONS

1. Cut the eggplant in half lengthwise. Then cut deep into the centre, making a crisscross pattern but not cutting through the skin.

2. Sprinkle some salt on the eggplant and keep it aside, for atleast 10-15 minutes. Then rinse thoroughly with water to remove the salt - (this step can be avoided, as we are using Japanese aubergines which are rarely bitter and doesn't need salting)

3. Preheat your oven to 180C/356F. Spread the eggplants in a single layer onto a pre-heated baking tray by lightly brushing it with olive oil. Roast it for 15 minutes in an oven, until it's evenly cooked. If they turn, soft and tender, they are done. Keep it aside and allow it to cool for couple of minutes.

4. Meanwhile, heat 1 tablespoon of olive oil in a medium pan, add ginger and garlic. Stir, for about 1 minute till it turns golden brown. Add chopped tomatoes and chopped green chillis, stir for about 4 minutes on medium flame. Using a spoon, scoop out the flesh of the eggplant and add it into the pan. Add all the spices (salt, turmeric powder, cumin powder and red chilli powder) and stir it well. Then, add handful of fresh coriander leaves, soy sauce or/and vinegar to get the flavor, but that's totally optional. Now, give it a good stir and switch off the flame. The stuffing is ready.

5. Fill in the aubergines with the stuffing and serve warm or at room temperature with lemon squeezed over.

NOTES

1. Sprinkle some salt on the eggplant and keep it aside, for atleast 10 minutes, as salting eggplant pulls the moisture from the eggplant. Then rinse it thoroughly to remove the salt.

2. For roasting the dish in a gas stove, add oil in a pan and rotate these aubergines till it turn soft and tender. Then fill the stuffing in the aubergine and serve warm or at room temperature.

3. You can also add vinegar and/or soy sauce in the stuffing to get the extra flavor, but that's totally optional.


Friday, November 3, 2017

AUBERGINE


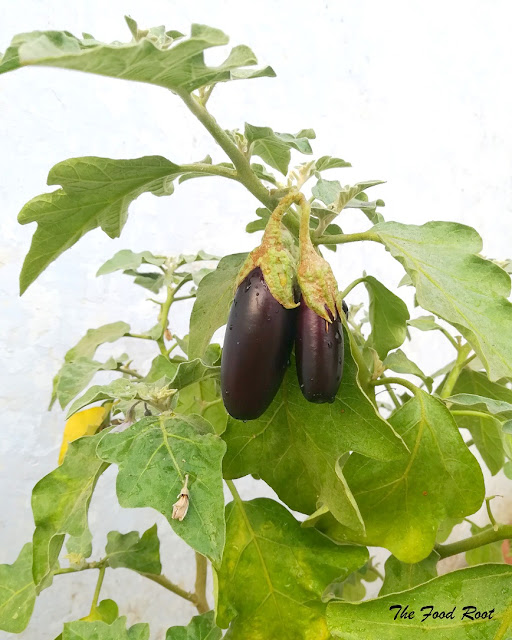
Japanese aubergine are long and narrow with edible seeds. They are usually 4-5 inches long and 1-2 inches wide.

Aubergine is typically a fruit but eaten as a vegetable. It grow in the same manner like tomatoes and peppers. They are usually deep purple in color, vary in different shapes and sizes and are harvested in mid to late summers. You can find this vegetable at any farmer's market or at any grocery shop. They are the most versatile vegetable available all across the globe.

They can be planted both in containers or a small patch of the garden. Harvesting too early or harvesting too late, would lead to poor quality and poor storage and hence is a cause for bitter taste of the fruit.


They are long and narrow with edible seeds. They are usually 4-5 inches long and 1-2 inches wide. They are generally less bitter and more tender than the other varieties of eggplants.


We harvested lots of Japanese Aubergines this year

Spices like Oregano, dried basil, thyme, black pepper, garlic powder, goes well with Aubergine. There are various ways to cook aubergine. You can grill, roast, mash, stuff them with a flavorful filling and stir fry it. They are low in cholesterol and rich in antioxidants, magnesium, potassium, and dietary fiber. Best eaten fresh, they can be added in stews, salads, soups, dips, curries and purees.

This season we have harvested heaps of Japanese aubergines. I'm planning to make an easy stuffed aubergine recipe this week. It's super simple, healthy and delicious.

Have you ever tried stuffed aubergine recipe yet? It has a smooth, creamy texture and a smoky taste. I'm going to share the recipe this weekend! So, do check this space out!

Tuesday, September 5, 2017

GARDEN FRESH TOMATO SOUP

Creamy tomato soup filled with just 3 basic ingredients - garlic, carrots, and lots of home picked tomatoes. It's low in calories and makes a great afternoon snack too.


Incredibly delicious tomato soup straight from my garden!

I'm little obsessed with tomato soup. I could probably eat it everyday and never get bored. The beauty of this soup is, it fills you up so you eat less. This soup has so much flavors that you will never buy a canned one again. This is one of my favorite soup, it looks fancy and it tastes great! This easy homemade recipe is filled with just 3 basic ingredients - garlic, carrots, and lots of home picked tomatoes. I also added a sugar and little cream to neutralize the tangy flavor of the tomatoes. It's low in calories and makes a great afternoon snack too.

Since my garden is overflowing with tomatoes of every variety right now, I decided to try my hand at making fresh tomato soup. I used all different varieties, colors, shapes and sizes of tomatoes from my garden. I used mix of fresh heirlooms, cherry, plum and vine tomatoes. This soup is full of garden fresh flavor and can be made in less than 45 minutes.

Boiling veggies in a pressure cooker is best for soups. It shortens the cooking time and doesn't require any butter or oil. I didn't fried the veggies, I directly pressure cooked them as it's a healthy way to cook soup. This soup is versatile, healthy and tastes delicious even without all that oil and butter.


I chopped the veggies into small pieces and added them in the cooker. Than added salt, crush dried basil, water, and, pressure cooked for 2 whistles. This process retains all the color, nutrition and vegetables get perfectly steamed. Sure, this adds few more minutes to the soup but it's totally worth it!!!

Always remember to strain off the liquid, and set aside to add back into the soup later. Blend rest of the contents to the blender to make a smooth puree and return to cooker. Add in the strain water and fresh water, stir occasionally. Bring it to boil, and, reduce the heat for 25-30 minutes, or, until tomatoes have cooked down. Add sugar, oregano, and, season it with salt and pepper. Stir in some fresh cream and heat through. Transfer into the soup bowls and add a bit more cream. Serve hot with crispy croutons on top and enjoy!!

This soup always taste better the next day. If you make a large quantity of the soup, place it in the refrigerator and freeze it but don't add a lot of cream at once. You can also add cashew cream as it makes a wonderful vegan substitute for whipped cream.

Do try this recipe and let me know how you like it!!!


GARDEN FRESH TOMATO SOUP

Serves: 4 People
Preparation time: 15 minutes
Cooking time: 45 minutes
Author: The Food Root

Ingredients

5 cloves garlic, minced
2 diced carrot
21/2 pound fresh tomatoes (mix of fresh heirlooms, cherry, plum and vine tomatoes)
3 cups - vegetable broth
1/2 cup - water
1 teaspoon salt or as per taste
1/4 teaspoon black pepper
1/4 teaspoon oregano
1 teaspoon dried basil, crushed
1/2 teaspoon sugar
1/2 cup heavy cream (optional)

Directions

1. Throw in the tomatoes, carrots, garlic cloves and crushed dried basil in the pressure cooker with 3 cups of water. Allow 2-3 whistles. Let the mixture cool for atleast 10 minutes.

2. Take a big enough bowl, strain the water and set aside to add back into the soup later.

3. Blend the soup - Pour all these contents into the blender in batches, and, blend until it's smooth. You need to do this in 2-3 batches. (You can add more water if needed)

4. Pass the tomato puree through the strainer, to remove the skin and seeds. (optional)

5. Return the puree into a pan. Add in the strain water and 1/2 cup water and stir occasionally. Bring it to boil, and simmer for 25-30 minutes or until tomatoes have cooked down.

6. Add sugar, oregano, and, season it with salt and pepper.

7. Stir in the few tablespoon of fresh cream over medium heat until you reach the desired texture.

8. Transfer tomato soup into medium bowls and garnish with cream. (You can avoid cream if you vegan)

9. Serve hot with crispy croutons on top and enjoy!!

Croutons

You can make croutons at home in just 2 minutes. All you need is 4 slices of breads of your choice. Place them on the cutting board, cut them into 1 inch cube. Melt 2 tablespoons of butter in a pan over medium heat. Stir in the seasoning. Add breads cubes into the pan and toss until they are lightly browned and crisp.

Notes

1. Always remember to strain off the liquid, and set aside to add back into the soup later.

2. Pureeing hot mixture in a blender can be dangerous so let it cool for atleast 7-8 minutes.

3. If you feel that your soup is watery you can add 2 tablespoon of rice

4. If you feel that it's thick you can add a little more water.

5. I also added a sugar and little cream to neutralize the tangy flavor of the tomatoes.

6. Cashew cream makes a wonderful vegan substitute for whipped cream.

7.  If you want to make a large quantity of soup, you can place it in the refrigerator and freeze it, and, eat on another day.

8. If you are going to freeze the soup don't add a lot of cream at once.

Thursday, August 3, 2017

QUICK CHICKPEA CURRY

Chickpeas delicately cooked in a tangy tomato gravy with aromatic spices! Layered with heat, tang and depth of flavor, chickpea curry taste best with naan, bhatura or rice.

Chickpeas delicately cooked in a tangy tomato gravy with aromatic spices!

Flavored with the aroma of cloves, cinnamon and bay leaves, chickpea curry is an extremely delicious dish for lunch, dinner or any kind of occasion! This dish can be found at any restaurant which serves North Indian food and surprisingly loved by all age groups. This is a fantastically easy dish to make and it's tasty too. Packed with protein and fiber, chickpea curry is one of my favorite recipes. It's comforting, warm, nutritious and can be eaten at anytime of the day. Layered with heat, tang and depth of flavor, chickpea curry taste best with naan, bhatura and rice.

My Mom prepares chickpea curry atleast once a week, yesterday when she made this, it was so so good, I had to share the recipe with you

Chickpea curry is cooked in a spice mix of bay leaves, cloves, cinnamon, turmeric, carom, ginger and garlic. But don't be overwhelmed by the long list of ingredients, the preparation is absolutely simple and easy to make. If you haven't try this recipe before, I would recommend you to try with the given quantities first.

Beans don't need to be soaked overnight, they can also be quick soaked. For quick soaking, boil the beans for 5 minutes, and let stand in warm water for about an hour. While cooking the chickpeas, add cloves, cinnamon, bay leaves, asafoetida, ground turmeric, salt and a pinch of baking soda in the pressure cooker. Baking soda is very effective as it helps in softening the beans and also decrease the cooking time. If you like the deep brown color of the chickpeas, you can add the 1 or 2 tea bags along with the above ingredients.

Heat 2 tablespoon of oil, add ginger and garlic, stir until fragrant. Throw in the tomatoes, stirring continuously for about 5 minutes. Add salt, chilli powder, ground coriander and roasted carom seeds, mix nicely. Next, add the cooked chickpeas and stir until the mixture is nicely mixed. Add the soaked water. Simmered, uncovered, for 5 minutes, until water is slightly reduced. Garnish with coriander leaves and serve with rice, naan or bhature!

If you want to add any additional vegetable, stir in some roasted paneer or any veggie you like and have in hand.


QUICK CHICKPEA CURRY

Serves: 6 people
Soaking time: 1 hour
Preparation time: 15 minutes
Cooking time: 30 minutes
Author: The Food Root


Ingredients

For Cooking Beans
1 cup - dried white chickpeas or garbanzo beans
4 cups - water
2 bay leaves
2 cloves
1/2 inch cinnamon
pinch of asafoetida
1 teaspoon - salt or as per your taste
1/2 teaspoon - ground turmeric
1/2 teaspoon of baking soda

For Tempering 
2 tablespoons - clarified butter or oil
6-8 paneer pieces, cut in small square shape
1/2 inch ginger - peeled, grated
5-6 cloves - garlic, finely minced
2 medium size tomatoes, chopped
2 green chillis, chopped
1/2 teaspoon - salt or as per your taste
1/4 teaspoon - red chili powder
1 teaspoon - ground coriander
1/2 teaspoon - garam masala
1/4 teaspoon - carom seeds, roasted
coriander leaves, chopped


Instructions

1. Quick soak the chickpeas: Wash 1 cup of dried white chickpeas under running water till the water runs clear. Place them in the in a pot with 4 cups of water, 1/2 tablespoon of salt and bring water to boil for for 5 minutes. Turn off the heat and let the chickpeas stand in the warm water for atleast 1 hour.

2. Cook the chickpeas: Open the lid and add ground turmeric, bay leaves, cloves, cinnamon, asafoetida, salt, ground turmeric and a pinch of baking powder. You can also add a tea bag (We don't generally do this but you can, for getting the deep color). Add water, (cold, preferably) if needed for consistency and pressure cook for 2-3 whistles on medium-high flame.

3. Sauté ginger and garlic: Meanwhile, heat about 2 tablespoons of clarified butter or oil in a non stick skillet, fry 6-8 paneer cubes (optional) and stir until it turns golden brown. Keep aside until needed in later steps. Now add grated ginger and chopped garlic, stir until crisp and golden brown, for about 1 minute on medium flame. (For the onion based gravy, add 2 chopped onions, continue to cook for 3-4 minutes, stirring often).

4. Prepare the tomato puree tempering: Next add chopped tomatoes, cook for 4-5 minutes on medium flame. Add chopped green chillis followed by salt, red chilli powder, ground coriander and roasted carom seeds, mix it well. Let the mixture cook till the oil separates.

5. Add the cooked chickpeas in the pan: Open the lid and drain the cooked chickpeas (but don't throw away the water. You can add the same soaked water in the pan to make the curry). Add the cooked chickpeas into the pan. Stir it for next 5 minutes, till the mixture is nicely mixed.

6. Prepare the chickpeas curry:  Add the soaked water in the pan to make the curry. Simmered, uncovered, for 5 minutes, until water is slightly reduced. Garnish with chopped coriander leaves.

7. Serve: Transfer the chickpeas to a serving bowl. Scoop the chickpeas with a bite of naan or rice and enjoy!!

Notes

1. Once you have drained the chickpeas, don't throw away the water. You can add the same soaked water in the pan to make the curry.

2. Add a pinch of baking powder while cooking the chickpeas (in the pressure cooker) as it helps in softening the beans and decreasing the cooking time.

3.You can also add a 1 or 2 tea bags (in the pressure cooker), for getting the deep brown color of the chickpeas. 


4. For the onion based gravy, add onions after stirring the ginger and garlic.

5. You can add in the variety of veggies, whatever you like and have in hand.

6. Avoid putting dry powdered spices directly to hot oil as it will burn quickly and curry may become little bitter. Add them after the tomato puree.

7. Spices like cloves, cinnamon, bay leaves, asafoetida and roasted carom seeds can be avoided.


Tuesday, July 11, 2017

MEDITERRANEAN CHICKPEA SALAD

In a large bowl, combine chickpeas, tomatoes and cucumber. Pour Cumin-Dijon flavored vinaigrette dressing over the top and toss it well. Season with salt and pepper, and garnish it with grated beets. Serve immediately!

Brighten your day with this fresh and colorful Mediterranean chickpea salad - packed with nutrients and taste! Filled with cooked chickpeas, cherry tomatoes, crisp cucumber, fresh beets and tossed in a vinaigrette flavored dressing with cumin and dijon. This recipe is completely vegan and gluten-free. Lately I've been a bit obsessed with chickpeas salads. This Mediterranean Chickpeas salad was a pure bliss. It has all my favorite Mediterranean flavors. It's super addictive and super satisfying!

Chickpeas are used in varieties of vegetarian recipes and are mostly added in Indian, Mediterranean and South American cuisines. They are very versatile and easy to cook. They can be added in salads, dips, soups, curries, ground into a flour to make variety of snacks like falafel, fritters, sev, boondi, and many more. Chickpeas are one of the best sources of protein, carbohydrates and fiber. 1 cup of cooked beans = 15 grams of protein


To prepare the chickpeas, soak the beans overnight or quick soak for about 4 hours. Add salt, water and pressure cook it for 15 minutes, over medium-high heat. When done, drain the chickpeas in a strainer and let it cool for a while. I usually cook the whole bag of chickpeas (500 grams) at once and use them up within a week. These are much more tastier and healthier than the canned one's.

This salad is particularly delicious if served when chickpeas are slightly warm. If it has been refrigerated, just be sure to allow it to come to room temperature before serving. To make this salad, you can cook chickpeas ahead of time. This salad has an endless combinations. You can pretty much throw in whatever you like. I love beets, cherry tomatoes and cucumber so I added that. Make a simple vinaigrette dressing, drizzle over the top and toss it well. Season with salt and pepper, and serve immediately! 


MEDITERRANEAN CHICKPEA SALAD

Serves: 2-3 people
Soaking time: 4-5 hours
Preparation time: 10 minutes
Cooking time: 15 minutes
Author: The Food Root


INGREDIENTS

1 cup or 200 grams dried white chickpeas (kabuli chana or safed chole)
2 medium size tomato, chopped
1 medium size cucumber, chopped
1 small size beetroot, grated
1/4 teaspoon black pepper
1/4 teaspoon salt or as per taste 

For the Dressing 

3 tablespoons extra virgin olive oil
2 tablespoons white wine vinegar (or apple cider, black wine, balsamic, rice)
1 tablespoon Dijon mustard
1/2 teaspoon cumin, roasted
1 tablespoon lime juice
1 tablespoon minced garlic
1/2 teaspoon dried oregano
1/4 teaspoon salt
1/4 teaspoon black pepper
1/4 teaspoon sugar or honey

DIRECTIONS


1. Cook chickpeas : Wash and soak the chickpeas overnight, or quick soak for about 4 hours in enough water. Drain the water, rinse it again with cold water. Add 1/2 tablespoon of salt and 2 cups of water and pressure cook it for around 15 minutes, over medium-high heat. When done, remove from heat and let it cool for sometime. Drain the chickpeas in a strainer and keep it aside. You can also refrigerate it for a while.

2. Chop raw veggies : Chop your favorite raw veggies and refrigerate until they are ready to use. You can pretty much throw in whatever you like. I added cherry tomatoes, cucumber and garnished it with fresh beetroots.

3. Prepare the dressing : Whisk all the ingredients - (olive oil, white wine vinegar, Dijon mustard, cumin, lime juice, minced garlic, dried oregano, salt, black pepper, sugar or honey) in a bowl until well blended. Refrigerate until ready to serve. The dressing keeps well for 3-4 days.

4. Assemble : In a large bowl, combine chickpeas, tomatoes and cucumber. Pour Cumin-Dijon flavored vinaigrette dressing over the top and toss it well. Season with salt and pepper, and garnish it with grated beets. Serve immediately! Enjoy!

NOTES

1. Wash and soak the chickpeas overnight, or quick soak for about 4 hours in enough water.
2. Chop your favorite raw veggies and refrigerate until they are ready to use.
3. You can make generous amount of dressing and keep it in the fridge for 3-4 days.
4. Whisk the vinaigrette 2-3 times, before serving.
5. This salad is particularly delicious if served when chickpeas are slightly warm.
6. If the chickpeas has been refrigerated, just be sure to allow it to come to room temperature before serving.

Friday, June 23, 2017

MEDU VADA - THE INDIAN SAVORY DOUGHNUT

Medu vadas are one of the most famous breakfast item across South India. It's made by split black lentils (urad dal) batter and deep-fried in a doughnut shape savory fritters. The lentils are soaked for 2 hours and than grind into a coarse paste. Add spices and veggies just 10 minutes before frying the batter and enjoy your crunchy and delicious medu vadas with your favorite chutney and sambar.

Mornings get so much better when Mom pampers with piping hot Medu Vadas aka The Indian Savory Doughnuts with coconut, coriander and tomato onion chutney.

Medu vadas are one of the most famous breakfast item across South India. They are made by split black lentils (urad dal) batter and deep-fried in a doughnut shape savory fritters. They are crunchy and crispy on the outside and soft on the inside. Medu vadas are an extremely delicious recipe for a breakfast, lunch or any kind of occasion. They can be enjoyed with variation of dips, lentils based vegetable stew (sambar) or even a cup of hot tea!

I grew up eating Medu vadas and nothing can supersede it. It's a staple food in our family. As a kid, my parents took me to 'Indian Coffee House', quite frequently and now we have a weekend ritual of dining out to the nearest 'Sagar Restaurant'. I have fond memories of gorging on idlis, utthapam, dosas but medu vadas remains my favorite. Yesterday, my Mom surprised us with these delicious medu vadas. It was raining most of the weekend here, so we enjoyed it even more.

Medu vadas are made by split black lentils (urad dal) batter. Wash the urad dal, soak them into the water for about 2-3 hours and grind into a coarse paste. Add the spices and veggies just 10 minutes before frying the batter and enjoy your crunchy and delicious medu vadas with coconut, coriander, tomato onion chutney and hot tea!

Do try this recipe, I would love to hear how it turns out for you!

Click the link on other South Indian dishes like:


Rava Dosa

Sambhar

Coconut Chutney

Mint chutney 

Peanut chutney 

Onion-tomato chutney


MEDU VADA - THE INDIAN SAVORY DOUGHNUT

Serves: 5-6 people
Soaking time: 2-3 hours
Preparation time: 15 minutes
Cooking time: 30 minutes
Author: The Food Root

INGREDIENTS

1 cup - split black lentils
2 cups - water
1 medium size onion, chopped
1 medium size capsicum, chopped (optional)
few curry leaves, chopped (optional)
1 tablespoon - rice flour (optional)
1 inch - ginger, grated
2 green chillis, chopped
1/2 teaspoon - cumin seeds, roasted
1/2 teaspoon - turmeric powder
1/3 teaspoon - garam masala
1/3 teaspoon - red chilli powder
1 teaspoon of salt or as per taste
coriander leaves, chopped
Oil for frying

INSTRUCTIONS

1. Rinse and wash a cup of split black lentils under the running water. Soak 1 cup of split black lentils in 2 cups of water for 2-3 hours.

2. Drain the excess water, if any, and add the soaked lentils in the grinding jar. Add enough water into the jar and grind it into a smooth paste.

3. Transfer the paste into a big bowl and add all the spices and chopped veggies (onion, capsicum, curry leaves, rice flour, ginger, green chillis, cumin seeds, turmeric powder, garam masala, red chilli powder, salt and coriander leaves) in the batter and mix it well.

4. Let the batter rest for 10 minutes.

5. Meanwhile pour sufficient oil in a deep pan, to a depth of atleast 2 inches and start heating your oil.

6. Take water in a small bowl, wet your hands, place some batter between the palms of your hands and lightly flatten it. Make a whole in the center of the batter to give it a doughnut like shape and gently transfer it in a pan and start frying until it turns golden brown.

7. Place them on a paper napkin to absorb excess oil.

8. Serve these delicious medu vadas with coconut, coriander, and tomato onion chutney and a cup of hot tea!

NOTES

1. Pour sufficient oil in a deep pan, to a depth of atleast 2 inches and start heating your oil on medium flame for first 5-6 minutes and than gently increase the flame, to the normal deep frying temperature of 350 degrees Fahrenheit (177 C).

2. You can fry atleast 4 medu vadas at a time, but it depends on the size of the pan.

3. You can add a tablespoon of rice flour and chopped veggies in the batter to make your vadas more crunchy and crispy.

4. Add the ingredients just 10 minutes before frying the batter and enjoy your crunchy medu vadas with your favorite chutneys!

Wednesday, June 14, 2017

PANEER BHURJI - SCRAMBLED COTTAGE CHEESE


Paneer bhurji, a simple and quick North Indian breakfast where cottage cheese is scrambled and sautéed with ginger, garlic, onions, tomatoes and spices.

A quick and simple paneer bhurji to mop with hot phulkas or any bread of your choice!


Paneer bhurji, a simple North Indian breakfast where cottage cheese is scrambled and sautéed with ginger, garlic, onions, tomatoes and spices. It makes a delicious light breakfast when served with hot phulkas, and are great protein rich fillings, for sandwiches, rolls and wraps. This dish is often served in the Dhabas (roadside eateries) with tandoori rotis and naans. For vegan version, you can substitute cottage cheese with tofu. 

You can make cottage cheese at your home or buy it fresh from the market. It's a super delicious side dish and wrap filling recipe! It's neither too spicy, nor too bland. It packs in protein, fibre and healthy fats. It's a simple recipe that gets ready in less than 15 minutes. I got 3 servings out of this recipe. It's a great side dish to make when you're out of fresh vegetables but need something healthy and delicious to eat.

This recipe doesn't call for dozen of spices, it can be made by adding few simple spices. I haven't done much. Just the tempering of ginger, garlic, onions, tomatoes, few spices, and, combining the mixture with scrambled cottage cheese and it's done! Enjoy the dish with hot phulkas or any bread of your choice, or roll the filling into a wrap or make sandwiches.

Give it a try and let me know if you like it! Sorry, I've been MIA for last couple of days. I wasn't well the whole of last week but am better now. Stop by again, as next few weeks are shaping up to be good with few posts on a pipeline!! 
Happy Wednesday Y'all!!! 


Paneer bhurji, a simple and quick North Indian breakfast where cottage cheese is scrambled and sautéed with ginger, garlic, onions, tomatoes and spices.


PANEER BHURJI - SCRAMBLED COTTAGE CHEESE


Serves: 3 People
Preparation time: 5 minutes
Cooking time: 12-15 minutes
Author: The Food Root


INGREDIENTS


200 grams - Cottage cheese (paneer)
2 medium size - Onions, chopped
1 medium size tomato, chopped
2 tablespoon - Olive oil or clarified butter
1/2 inch - ginger, peeled (grated)
4-5 - garlic cloves, finely chopped
2 green chillis, chopped
1/4 teaspoon - Turmeric powder
1/2 teaspoon - Red chili powder
3/4 teaspoon - Coriander powder
1 teaspoon - Salt or as per taste
chopped coriander leaves


METHOD


1. Heat olive oil or clarified butter in a non-stick skillet. 

2. Add grated ginger and chopped garlic, stir it, until they are crisp and brown, for about 40-50 seconds on medium flame.

3. Add chopped onions, sauté it, until lightly softened, for about 3-4 minutes on medium flame.

4. Add chopped tomato and stir for 2-3 minutes on medium flame.

5. Next, add chopped green chillis and spices - turmeric powder, red chili powder, coriander powder and salt. Mix it well.

6. Scramble the cottage cheese and add it in the mixture. Stir well to combine. Cover the pan for 2-3 minutes.

7. Remove the pan, and garnish it with chopped coriander leaves. Turn off the stove and transfer the paneer bhurji immediately to a serving bowl.

8. Serve it hot with tandoori roti or any bread of your choice!


NOTES


1. It's a super delicious side dish and wrap filling recipe for sandwiches, wraps, rolls and even paranthas!

2. For vegan version, you can substitute cottage cheese with tofu.

3. You can also add peas and capsicum in the dish but it's totally optional.

Monday, May 29, 2017

HOW TO MAKE POHA

How to make poha


Poha is the most underrated yet the most loved breakfast of all time!

A plate of poha or beaten rice/flattened rice is a perfect treat for those lazy mornings when you don’t want to spend much time in the kitchen! It's a super quick meal option, and is very healthy and filling as well. I’ve been making lot of poha on the weekends lately. It’s one of my go-to recipe. You can purchase a packet of Poha from any Asian supermarket or grocery store. Poha is that one street food snack which is popular almost everywhere in India.

This dish always reminds me of my college days in Pune. On my way back home from college, my brother and I use to stop by a stall and have a plate of poha for breakfast. Being located at a prime spot, that stall became the hub for every Poha lover. It was the favorite breakfast place for many college-goers out there. No other restaurant serves the poha like theirs, it was that great..!!

Moving on,

You can make Poha more nutritious, spicy, colorful by adding different vegetables. It is very similar to how upma is made. Just when the mixture is ready, add the poha, toss it nicely and it's done! But before adding poha into the mixture, do remember to rinse it in a strainer, under running water, for about 2-3 times.

This classic one-pot dish is loaded with diced potatoes, chopped onions, peas, peanuts and tempered with mustard seeds, curry leaves, asafetida, turmeric and various other spices. Finish it with a handful of chopped coriander leaves, sprinkle some spicy mixture (sev) and squeeze in some fresh lime juice. Oh man, it just tastes so good! You will just love it!!


HOW TO MAKE POHA


POHA


Serves : 4 people 
Preparation time : 6-8 minutes 
Cooking time : 15 minutes
Author : The Food Root 

INGREDIENTS

Tempering
1.5 cups poha or flattened rice
3 tablespoons - oil
1 teaspoon - mustard seeds
2-3 curry leaves (optional)
pinch of asafetida
few peanuts
1 onion, chopped
1 potato, diced
1 tomato, chopped
2 green chillis, finely chopped
1/2 teaspoon - turmeric powder
1/2 teaspoon - coriander powder
1/2 teaspoon - cumin powder
1/2 teaspoon - red chilli powder
1/3 teaspoon - garam masala
teaspoon - salt or as per taste
1/2 teaspoon - sugar

Garnishing
chopped coriander leaves
spicy mixture (sev)
fresh lime juice

DIRECTIONS

1. Gently rinse the poha in a strainer, under running water, for about 2-3 times. Set aside to drain, for 10-12 minutes. 

2. Heat oil in a large skillet, add mustard seeds, curry leaves and a pinch of asafetida. Stir and fry until the mustard seeds begin to splutter and pop.

3. Add few peanuts and sauté it for a minute, till it turns golden brown.

4. Add chopped onion, stirring occasionally, until lightly softened, about 3-4 minutes on medium flame.

5. Add in some diced potatoes and cover the pan for 2-3 minutes. Remove the lid and sauté it for 2 more minutes

6. Next, add chopped tomatoes, followed by finely chopped green chillis, stir it for next 3-4 minutes on medium flame.

7. Add in the spices - turmeric, coriander, cumin, red chilli powder and salt to taste. Stir it nicely.

8. Sprinkle some sugar on poha and gently mix it while using your hands. Then, add it in the pan and toss it. Cover the pan for 3-4 minutes.

9. Remove the lid and finish it by adding some garam masala and a handful of chopped coriander leaves. Sauté it one last time and it's done.

10. Serve piping hot, with some spicy mixture on the top! Squeeze in some fresh lime juice and enjoy! 

NOTES

1. Always rinse the poha in a strainer or a colander, under running water at least 2-3 times and then set it aside to drain, for 10-12 minutes.

2. If the poha gets too dry, sprinkle some water on it and serve immediately.

3. Poha usually comes in thick and thin varieties. I have used the thicker variety of poha here, in the recipe. Though, they take longer time to absorb water, but I find them much more tastier than the thinner ones.

4. You can make Poha more nutritious, spicy and colorful by adding different vegetables.